Monday, October 28, 2013

Super Saturday - Painted Towels and Wooden Spoons

I wish I had pictures of all the lovely spoons and towels that people made this Saturday. It was so fun to see all the different color combinations and styles!

If you are creating both towels and spoons I recommend that you start with your spoons and alternate between them and your towels so that you will have something to do during the drying processes.

Materials:
Wooden Spoon
Tape
Sand Paper
Acrylic Paint (The cheap kind you find at Walmart in little bottles for about 50 cents works perfectly!)
A cup big enough to tip your spoon upside down into while drying

Spoon How To:

Tape off the top portion of the spoon leaving an inch or two between the spoon and the handle.
Lightly sand the handle of your spoon removing excess dust with a quick rinse and dry when finished.
Paint a thin coat on the handle and let it dry until dry to the touch, about 15 min.
Repeat two more times.
Let it sit for 24 hours.
Wash in your dish washer on the heated dry cycle to set the paint.


If you want to create a varigated color look, simply start with the darkest color first and be ready to add plenty of white or cream.

Towel How To:

Materials;

Towel
Tape
Acrylic Paint (The cheap kind you find at Walmart in little bottles for about 50 cents works perfectly!)

Pre-wash and iron the towel so that the paint will better adhere (DONE!)
Create an interesting pattern for your towel by taping along the borders. You may wish to tape a few lines off, criss cross them, or just free hand.
Paint a light coat inside the tape lines. The voids where the tape is will be white like the towel. Use one color or a variety of colors.
Let your towel dry for 15 min.
Add another light coat.
Remove tape and let sit for 2 days.
Wash to soften the paint lines.
Iron for a crisp finish.

This is a picture from a blog how to I found that was really helpful. To visit click here.


I didn't find any linen towels so we ended up using Flower Sack towels found at Kmart & Target, But if I were making these for a loved one I would definitely buy some linen and fashion my own hand towels. I think they would make a great Christmas present!

For more crafting fun Click Here

Super Saturday Visiting Teaching "Pop By"

Here is another idea we created for our Super Saturday. The idea is to have a stash of handouts that you can just quickly grab to give to the sister you are visiting. This one reads: Thanks for letting us "pop" by! We used Orville Redenbacher's Movie Theater Butter Popcorn. We wrapped the outside of the popcorn bag with scrapbooking paper, added a bow, and the tag.


For more crafting fun Click Here

Super Saturday - "Rat Eyes" Treat Bag

Here is another tutorial and free printable for a great Halloween treat bag gift we made at our Super Saturday!


For more crafting fun Click Here

Super Saturday Gift Bag


This is a Christmas gift bag that we created for our Super Saturday. The letter M was a cardboard letter covered in Martha Stewart glitter. You can't really see it very well in the picture but the linen has a gold fleck to it and sparkles a little.

Here is a great tutorial for how to create a draw string gift bag. They can be stuffed with mittens, or treats, or anything you can imagine. I love it!


For more crafting fun Click Here

Super Saturday - Pop Up Ornament


This was also one of my favorite crafts that we did for our Super Saturday. It is basically a little pop out picture book that can either be hung on the tree like an ornament or set on the coffee table for people to look at. I thought it would be really fun to do one each year and fill them with the most recent pictures of the kids. I imagine that it would be a lot of fun in 20 years or so to look back on all the years, or better yet let the grandkids look at pictures of their parents growing up when they come for a Christmas visit.

Here's what they look like when they are open. This is an example with only 2 pages of pop ups. My favorite is a 3 page pop up, but really you can do as many or as little as you want. Pictures can be put on both the front and back of the book!


Ornament Directions:

Materials:
2 pieces of stiff card board cut to 3X3 squares
2 pieces of decorative scrapbooking paper cut to 4X4 squares
2 or more pieces of cardstock cut to 5 3/4 inch squares
1 Piece of ribbon cut to 2/3 of a yard or 24 inches
1 piece of narrow ribbon cut to 6 inches
1 6 inch piece of hemp or baker's twine
1 tag
1 small crystal embelishment
glue stick (Elmer's Glue All is the best)
wet glue  (I really just like Elmer's)


1. Glue 1 square piece of cardboard centered over wrong side of decorative paper using glue stick.
2. Clip corners leaving an 1/8 in between the corner of the cardboard and your diagonal clip.
3. Fold opposite edges of decorative paper over and glue down using wet glue.
4. Fold and glue remaining edges.
5. Repeat for 2nd set of decorative paper and cardboard.


6. Fold small piece of ribbon in half to create ornament tab. Glue ends together.
7. Glue ornament tab to the inside of one of your finished covers to create the back cover.
8. Fold one of the large square pieces of paper in half.
9. Open up the same piece of paper and fold in half the other way.
10. Open up the same piece of paper once more, turn it over, and add one diagonal fold.


11. Repeat steps 8 through 10 for the other square piece of paper.
12.  Fold each of the square pieces of paper into a small square by pinching in the diagonal folds.


13. Chain the two small pop up squares together by slipping one of the small squares into the other small square and gluing. Test to make sure it will open correctly before using the glue.


14. Glue the pop-out squares you have created to both the front and back covers of your ornament, making sure you add a little glue on the other side of the ornament tab.


15. Now is the time to add your 2 5/8 in pictures. You can glue them to both the front and the back of your ornament’s pages. Some of them will remain square, while others will need to be folded diagonally. It is helpful to place each picture before gluing and folding to make sure that they will be oriented in the direction you want them to face.
 16. Let your ornament sit open for a while so that you don’t accidentally glue your ornament shut.
 17. After Your ornament has finished drying close it up and tie a ribbon around the center in a bow.
 18. Bedazzle the letter i in Christmas for the Merry Merry Christmas tag.


 19. Connect your Merry Merry Christmas tag using the small piece of hemp and tie a knot.
 20. Voila! You are finished!

Here are just two of the other cute patterns we used.


For more crafting fun Click Here


Sunday, October 27, 2013

Super Saturday - "Boo Bag"

As part of our Super Saturday crafts we decided to do a few quick neighbor gifts or visiting teaching handouts. One of them was the you've been booed "Boo Bag".


So basically Women decorated a brown paper bag, but it was up to them to fill it with goodies :-)

For more crafting fun Click Here

Super Saturday - Dino Hoodie


One of my very favorite projects for Super Saturday was the dino hoodie project! We used all kinds of fleece and all different colors of hoodies. It was so fun to see how they all turned out!


Materials:
fleece (I bought 4 inches of 3 different patterns of fleece) 
hoodie
thread
sewing machine
triangle template (I made a triangle template with a 3 inch base and a 3 inch height) with a fold line marked at the base of the template
pins
iron
ironing board
Quilting ruler

How To:
1. Cut fleece strips into 3 inch strips using your quilting ruler.
2. Cut strips into 3 by 6 inch rectangles.
3. Take a rectangle piece of fleece and fold it in half so that you now have a 3 in square.
4. Using the triangle template trim your rectangle into a folded triangle. When you open it up it should be in the shape of a diamond. Make sure to place the fold line on the template on the fold of your fleece. Repeat for all pieces of fleece.
5. Iron a fold line down the center of the hoodie. The hood already has a center seam.
6. Pin the diamond pieces in a continuous line to the center seam of the hoodie so that the short ends of the diamond are running along the center seam.
7. Stitch along the center seam over the diamonds from the top of the hood to the bottom of the hoodie.
8. Close up the diamonds so that they create triangle spikes by top stitching them closed.
9. Clip threads and you are done!

You can also experiment with the size of spikes you create. Larger spikes tend to flop around from side to side and are very cute. The shorter spikes tend to stick straight up and are a different kind of fun. For the most part though I tend to like a triangle that is based off a square. So for example: when creating my triangle template I start with a 4 inch square (or 3 inch square...etc). The bottom of the square will be the bottom of your triangle. Mark the center at the top of the square, so at the 2 inch mark. Use a ruler to connect the bottom corners to the center on the top of your square and trim edges to form a triangle.

For more crafting fun Click Here
Click Here for more Needle and Thread  

Wednesday, October 23, 2013

How To Carve a Pumpkin

This week I got to visit my youngest's kindergarten class and demonstrate how to carve a pumpkin. It was very fun and I enjoyed watching all the kids' reactions. I thought I knew pretty much how to carve a pumpkin, but before I went in I thought I would do just a little research just to make sure. Here's what I learned.

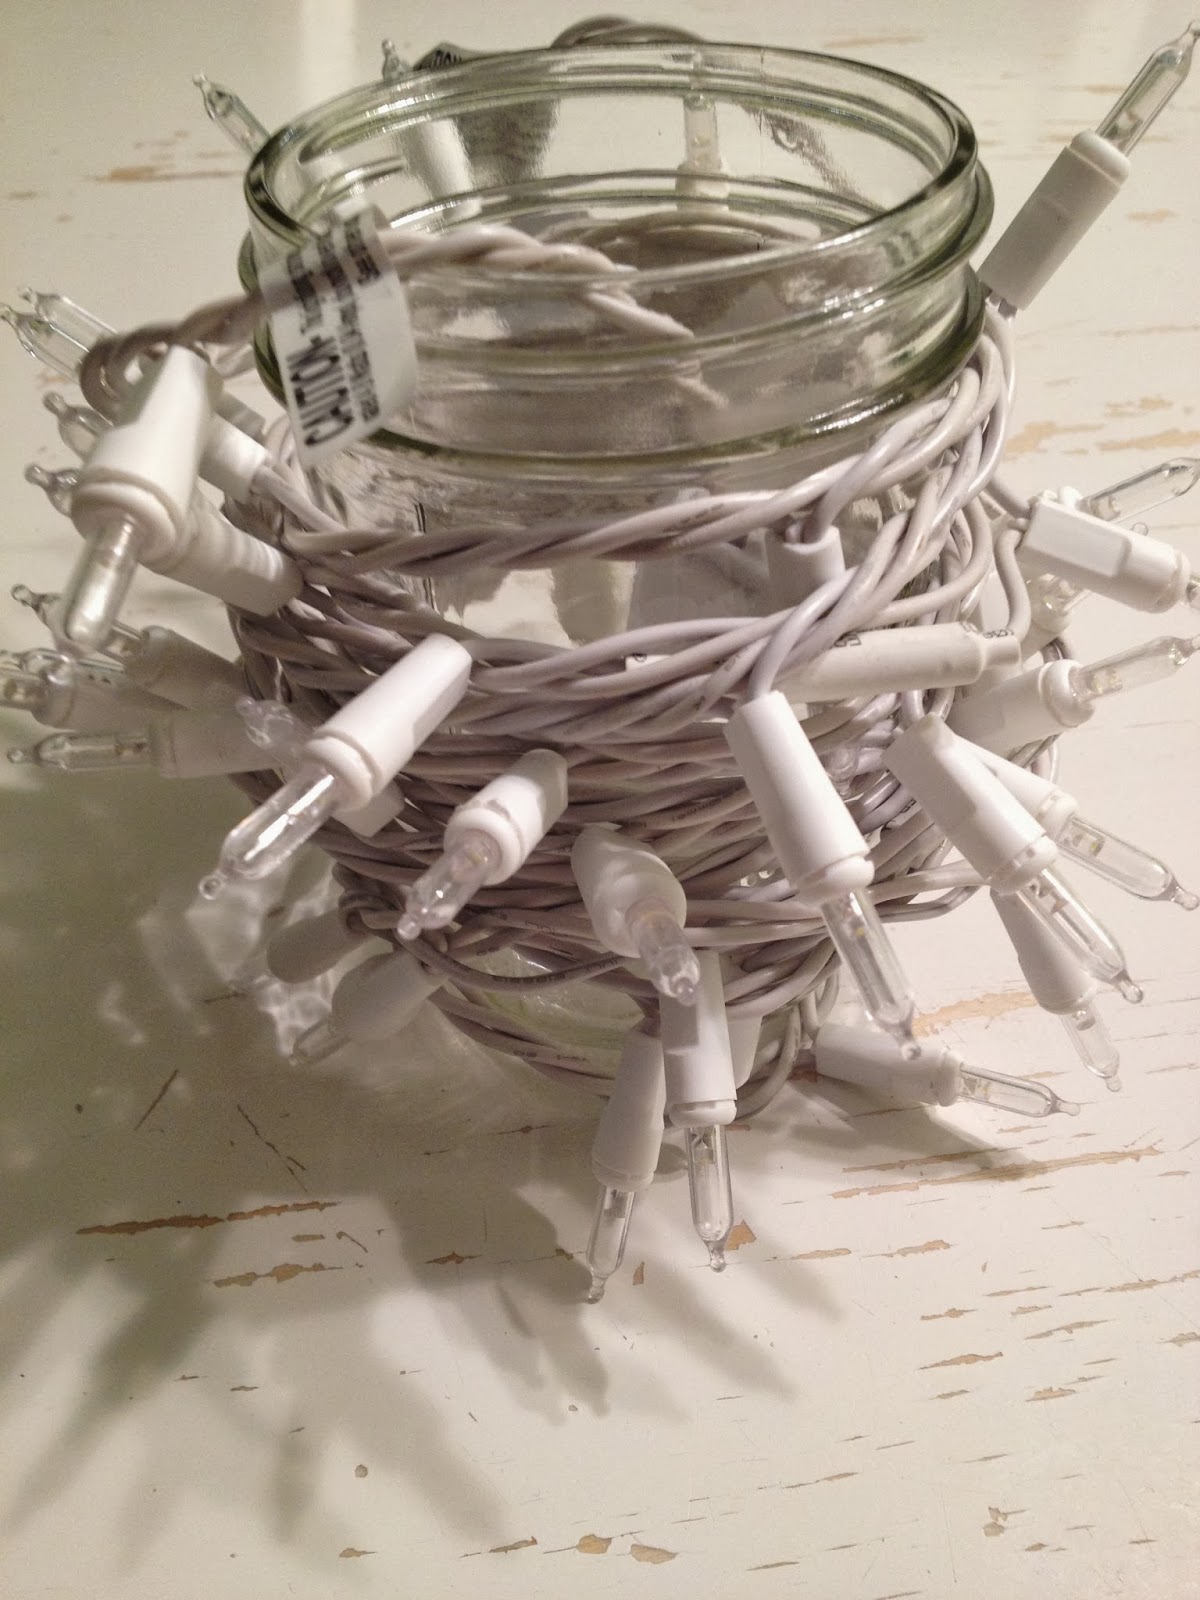
1. The first thing you have to do is decide how you will be lighting your jack-o'-lantern up. For example, will you be using a candle or Christmas lights*?

2. For a candle cut a hole in the top of your pumpkin, for Christmas lights it is handy to make the hole in the bottom. You will need to make the hole about two inches larger than your jar, so that it and the Christmas lights will fit through.


3. Next you have to gut the pumpkin using a large metal spoon or a fleshing tool. Remove seeds, pulp, and flesh.

4. Sketch the design you want to put on your pumpkin or print a free template from online.


5. Tape your design onto your pumpkin so it doesn't move around. Next use a sharp awl, needle tool, or thumb tack to transfer your design by pricking holes around the contour of your design.

6. Carve your pumpkin using a serrated kitchen knife or one found in a pumpkin carving kit.


*If you choose to use Christmas lights wind them around a large mason jar and fasten in place with a bit of tape.


For more crafting fun Click Here

Wednesday, October 9, 2013

Little Paper Boxes


This week to get the kids ready and thinking about conference I delivered little paper boxes stuffed with Hershey's nugget chocolates and a message about how to prepare for conference, but I think this would be fun for any reason. The message read:

How to make the most out of General Conference:
1. Make conference personal by reviewing the names and faces of the general authorities.
2. Make a list of questions of concerns you would like help with. Ponder and pray about your list.
3. Have note-taking materials ready.
4. Use your notes to help set personal goals to act on what you've learned or what you've been prompted to do.
5. Follow the prophets by obeying their counsel.

The boxes are super easy to make, Just see below for what you'll need to know.

Materials:
Paper (I used four different 12X12 Scrapbook papers)
Ribbon
Chocolate
Paper cutter
glue
ruler (I used my see through quilting ruler and it was perfect)

Box How To:
1. First you will need to get your paper ready. For one box cut 1 piece of paper 5 1/2 by 3 7/8 inches for the box, 1 piece 4 1/2 by 3 inches for the box wrapper, 3 pieces 1 by 3 inches for the chocolate wrappers. If you happen to have a tag punch this is cute too.


2. To make the box take the piece of paper that you have cut to 5 1/2 by 3 7/8 and score it twice on each side. Score one line at 5/8 of an inch and the other line at 1 1/4 inch. Create creases on the score lines. Next you will cut on the fold lines so that your box now looks like this.


3. You will also have to add a diagonal crease to the 5/8 inch squares created by the fold lines in each of your corners going from the outside corner to the inside corner where your fold lines meet by scoring a line first. Just like this.


4. Next it's time to fold your box, no glue necessary! Start by making sure you have good creases on all of your fold lines. This will make folding your box much easier. Using the diagonal folds in the corners pinch in your short sides first.


5. Next fold the short sides of your box over the diagonal folds hiding them. They will continue to pop out until you fold your long sides down.


6. Wrap your chocolates with the 1 by 3 inch pieces of paper seams down and set them in the box along with any message you may want to add.

7. Create your match box top by wrapping your box with the 4 1/2 by 3 inch piece of paper creating folds where necessary and making sure that your seam ends up on the bottom side of the box. Glue down seam.

8. Tie a ribbon around your box and add a tag.

Voila! You are finished!


Thursday, May 23, 2013

Forget-Me-Not Garden Party Shower Invite

Next week a friend of mine and I are having a shower for one of our friends. We decided to use a garden party as the theme for the shower and had the idea of using Forget-Me-Not seed packets to create the invites. We put all the details of the shower inside the seed packet with the seeds. Here's how they turned out!


For more crafting fun Click Here

Wednesday, May 22, 2013

Put The Lime In The Coconut


This last week was Chad's Birthday and he requested Coconut Cake, not my favorite, but this cake could make anyone change their mind! You'll have to forgive me, but I cannot figure out where I got the recipe. I searched and searched online, but could not find the recipe nor the pretty picture I've had stored in my recipe file on my computer anywhere, So here it is, And it is delicioco!

Ingredients

Original recipe makes 1 - 9x13 inch pan, which is much easier to serve out of, but I love a good cake stand. Just be prepared, if you use a cake stand it takes some finesse to get the cakes out of their pans after they have soaked. YUmmmm. I'm still trying to perfect my method of removal :) If you want to do a great 3 or 4 layer cake you will need to double this recipe

1 (18.25 ounce) package white cake mix
3 eggs
1/3 cup vegetable oil
1 cup water
1/2 teaspoon coconut extract
1 (14 ounce) can coconut cream
1 (14 ounce) can sweetened condensed milk
1 cup heavy whipping cream
1 tablespoon white sugar
1 cup flaked coconut


Directions
Preheat oven to 350 degrees F (175 degrees C). Grease and flour a 9x13 inch pan.

In a large bowl, mix together cake mix, eggs, oil, water and coconut flavoring. Beat for 2 minutes and pour into 9x13 inch pan. Bake for 30 minutes, or until a toothpick inserted into the cake comes out clean.
In a medium bowl, combine coconut cream with sweetened condensed milk and stir until smooth. When cake comes out of the oven, poke holes into it in even rows using a large fork or chopsticks. Pour milk mixture over, allowing it to soak into the cake. Refrigerate for several hours or overnight.
In a large bowl, whisk cream until soft peaks form. Add sugar and continue whipping until stiff. Spread over cooled cake. Sprinkle top with flaked coconut. Optional: garnish with limes.


For more recipes Click Here

Tuesday, May 21, 2013

Book Worms for the Book Worm

This Sunday we worked on the lesson called: How can I improve my scripture Study? This was a very fun lesson (for Me)! I found Brother Eyring's interview and the section called Teaching From The Scriptures from Teaching, No Greater call to be very helpful! I enjoyed making and sharing a list of ideas of how the youth can develop their own personal scripture study approach. The kids helped to make a great list!

- Provide context: ie answer the questions who is speaking, whom is that person speaking to, What is he or she speaking about, what is he or she responding to, and why is he or she saying this?
- Liken the scriptures unto yourslef
- Use the study helps in the scriptures: Topical Guide, maps, and The Bible Dictionary  
- Look at the footnotes and cross reference
- Read the headings of chapters and sections, introductory pages to the scriptures, study the maps, and use the topical guide to look up specific subjects.
- Mark your scriptures: come up with your own personal system that works best for you, ie color by subject etc
- Scripture Linking
- Make notes in the margins
- Study you scriptures at a specific time each day, be consistent
- Say a prayer before you begin and after you finish

and per usual I love to make a great handout. I loved this idea I found on Pinterest!


Here's how mine turned out!


Tuesday, May 14, 2013

Brown Paper Packages Tied Up With String...

This Sunday we learned about testimonies and how to share them. Because it was Mother's Day we decided why not share our testimonies with our mothers! So after learning about the different parts of a testimony and the importance of sharing it, we wrote down our testimonies for our mothers. I also found this great free printable and tutorial for button magnets at inkablinka.com.


Although we ended up wrapping up both the buttons and our testimonies in some brown paper packaging tied up with string and a little tag that said Mothers are like BUTTONS they hold everything together! I just loved the cute little button magnets!

This is where I got the idea for the brown paper packaging. There are tons more ideas for wrapping up gifts!


Monday, April 1, 2013

I mustache you a question?

So I have a new calling! I am out of YW and am now teaching the 12 & 13 year old Sunday School Class. What a fun group, and I really do love the new curriculum! Just to get them prepared for the lesson I created these fun little goodies to hand out during the week. The lesson was one in which they were able to share their favorite scripture about the Atonement, so I put the question on the back of the KitKat bar. Got to love those cute little mustaches!


Personal Progress Holders

Last year as a group we really focused on Personal Progress. This is one of the PP holders we made for each girl. It holds a journal, a pen, the For The Strength of Youth pamphlet, and their PP book.


I found this tutorial chocolateonmycranium to be very helpful! We got together as leaders to make these, but really they are simple enough that the girls could have made them for an activity. The only recommendation that I would make is to have everything pre-cut before hand.

Click Here for more Needle and Thread
For more crafting fun Click Here

Tuesday, February 5, 2013

Craft Night

This last week we found out that our Young Womens President is moving. I wanted to find something fun the girls could do to show our love and appreciation for all that she has done for us, so we came up with the idea of making a little house warming gift for her and her family. It was so much fun! The girls helped to make 3 different projects. We made wooden spool dolls for her two little girls, painted wooden spoons, and I had fun following an online tutorial for making a casserole carrier.


The wooden spool dolls were by far my favorite. They are so addictive! Once you make one, you will find yourself wanting to try different colors, hairstyles, smiles, etc. Here is a couple of pictures I used for inspiration!


Most of the pictures I found were from people selling them on Etsy. Wunderkind was one shop that I found to be particularly inspiring!

Here are some pictures of some of the dolls the girls made that night.


 It was so fun to see how everyone's turned out! They were all so different!

So now for just a small tutorial.

What you will need:

Vintage wooden spools, I found mine at Joann's in the wooden crafts section, but I imagine that they wouldn't be hard to find at any craft store.

Wooden knobs for heads. We used both wooden balls and the wooden knobs. The knobs have a flat surface on the bottom which make them much more easy to assemble.

Wooden dowels that fit inside the holes in the knobs and spools. You can manage without, but it makes it much easier to paint the heads if you have some way of holding the heads. I actually used the end of a spare paint brush as a sort of turntable instead. Also if you purchase the wooden dowels you can actually glue them inside the head and spool to give added support and keep the heads from coming off easier. I however did not do this on my first round. Luckily none of the heads have popped off yet, but I'm sure it will provide peace of mind against choking hazards if you do use the wooden dowels.

Floral foam to hold dowels. 

Acrylic paint

Paint brushes, lots of different sizes and tips.

Superfine black paint pen or a hairline tipped black sketch pen for making eyebrows. I found that even the fine tipped paint pens were to thick and preferred to use one of my hubby's pens!

Elmers wet glue,  some people use a hot glue gun, but I find that after it dries the wet glue holds much better.

Hot glue gun and glue

Clear Acrylic Sealer

OK, so now to get started. The first thing you will want to do is glue your dowel into your wooden knob and paint your hairline and hair. Doing the hairline first makes painting the face in so much easier. I like to do at least two coats to get my hair looking great. Three doesn't hurt either. If you want to make your wooden doll look like it has highlights you can dip the very tip of your paint brush in white or some other color and add a few streaks in while the first coat is still wet. I like to let that dry just a little before I carefully add the third coat of just the regular color on top, covering up any obvious streaks.
 

Next use your black paint pen or sketch pen to fill in the eyebrows. Then add rosy cheeks and a cute little smile! I am completely uncoordinated when it comes to the fine details like eyebrows and mouths, but I did find it easier to make my mouth heart shaped instead of trying to paint in little lips.

At this point, if you bought wooden dowels you can stake them into your foam. Take them out back and following manufactures instructions add at least two to three coats of sealer.

After your heads have dried trim the dowel down so that it does not poke out through the bottom of your spool. This can be easily accomplished by scoring it with a pair of scissors and then just breaking it off. Add a little wet glue to help secure it in the spool.

Next you can add whatever type of ribbon you want to the spool. I've seen some that just wrap a smaller ribbon a couple times around to cover the spool, but for these I opted to select ribbon about the same size as the spool. To add the ribbon you will first want to measure a piece about a cm larger than you need to go all the way around the doll. Seal the edges of the ribbon to prevent fray by using a lighter to melt the edges of your ribbon. This might take some practice. You don't want to actually burn the ribbon and you don't even need to touch the flame to the ribbon, just get it close enough to melt the very edge. If it is turning brown, then it is too close. After you have sealed both edges of your ribbon its time to affix it to your wooden spool. I just happened to have double sided sticky tape, but this is not your average sticky tape, it's more like glue, and is capable of doing some pretty hefty jobs. I know I ordered it online for another project, but can't remember where I got it. I would recommend using a very small amount of hot glue on just the ends of your ribbon. Start by adding a small amount of glue to the back side of your doll. Place the ribbon over the drop of glue, wrap the ribbon around your spool and add a small drop of clue covering the ribbon which is already glued down. Then cover it with the opposite end of the ribbon you have just wrapped around the spool. You will also want to make sure that your seam is facing the back of your doll.

And voila you have a beautiful if not somewhat funky wooden spool doll!


For more crafting fun Click Here