Saturday, January 30, 2016

Mixed Berry Macaroons

These Mixed Berry Macaroons are better than any store bought macaroon I have ever tried! I am simply in love!


Macaroon Ingredients:

1 1/4 cups of powdered sugar
2/3 cup almond flour
pinch of salt
2 egg whites
1/4 teaspoon of cream of tarter
1 Tablespoon of sugar
1/4 teaspoon vanilla
A small amount of food coloring

*SILPAT cookie sheet


1. Sift together powdered sugar, almond flour, and salt. Set aside.
2. Beat egg whites for about 30 seconds on medium speed until white and frothy.
3. Add in cream of tarter and beat for 60 seconds on high. The eggs should be white in color and hold the line of the whisk.
4. Continue to beat adding in the sugar, vanilla and food coloring for another 60 seconds until peaks are stiff and the whites are shiny. Do not whip for longer than 60 seconds.
5. Now fold in the almond flour mixture with a rubber spatula. About 30 strokes. You don't want to over mix otherwise the macaroons will not do what they are supposed to.
6. Most recipes call for filling an icing bag with the batter and squeezing out 1 1/2 inch rounds, but I prefer to use my tiny cookie scoop. The cookies end up being a lot more uniform in size and I feel like I have more control. Don't even try to get away with using parchment paper. *You have to use a SILPAT cookie sheet. It's the only way they'll ever come off! Here's about what they should look like.


The above are Chocolate Macaroons, stay tuned for the recipe! Otherwise you might end up in tears with something that looks like this! These were on of my first attempts. I didn't care for this recipe at all!


7. Thump them down a couple of times on the cookie sheet and let them sit for 30 minutes forming a hard skin on the top.
8. Preheat oven to 350 degrees.
9. Bake for 7 minutes then rotate your cookie sheet and bake for another 6-7 minutes.
10. Let them cool completely.
11. Add filling by either spooning a generous Tablespoon into the center of your cookie or piping it on in rounds. If you spoon it on, you can use the top to gently press the mass of filling out towards the edges.  Either way make sure not to handle the macaroon on the tops, they are very delicate and will smash in and not be as pretty. Handle the cookies by holding them on their sides.
12. Et Voila! Enjoy!


Filling Ingredients:

1 1/2 cups of mixed berries (I used Frozen)
2 Tablespoons of water
1/4 cup of butter + 1/2 cup of butter at room temperature
1/4 cup of powdered sugar + 1 cup of powdered sugar
2 teaspoons of fresh squeezed lemon juice


1. Heat water, berries, and 1/4 cup of powdered sugar to a boil. Cook until the fruit begins to break down.
2. Blend in a blender on high until smooth.
3. Strain using a sieve until all the seeds are eliminated. Set aside.
4. Whisk 1/2 cup of butter and 1 cup of powdered sugar until smooth.
5. Add lemon juice and SOME of the syrup to taste and consistency. You don't want your filling to be too runny, but you want the delicious flavor of the berries. So go SLOWLY and make sure you have a good consistency. Set aside the rest of the syrup to use as a garnish or as syrup for pancakes!

You may choose to drizzle a little of the berry syrup along the plates, it adds beauty and flavor!

Hope you enjoy!

I really enjoyed using the leftover syrup on our pancakes the next day :-) It brought back good memories of spending the night at one of my best friend's houses growing up. They made pancakes and fresh syrup every saturday and they always had about 4 different kinds. The berry syrup was my fav!


Tuesday, January 19, 2016

Favorite Oatmeal Cookies

This is a Brown Family Favorite!

Ingredients:

14 Tablespoons of butter, let them sit on the counter for about an hour before you use.
1 Cup of granulated sugar
1/4 cup packed light brown sugar
1 egg
1 teaspoon vanilla extract
1 teaspoon of cinnamon
1/2 teaspoon of salt
1/2 teaspoon of baking soda
3/4 teaspoon of baking powder
1 cup of all purpose flour
2 1/2 cups of old-fashioned rolled oats

Cream the butter and sugars for 30 seconds, scrape down the sides of the bowl and mix for another 30 seconds.
Add in the egg and mix for another 30 seconds. Scrape down the sides of the bowl.
Add in the vanilla, cinnamon, salt, baking soda, and baking powder and mix for 30 seconds. 
Add in the flour and mix for 1 minute. Scrape down the sides of the bowl.
Add in the oats 1/2 cup at a time until fully incorporated.

Bake at 350 degrees for 10-13 minutes until the edges are crispy and golden.


post signature

Monday, November 23, 2015

Dollar Store Sock Snowmen


These Dollar Store Sock Snowmen are so much fun to make and the kids love them! Use them as decorations or as christmas giveaways.

Here's what you need:
White socks from the dollar store ( I used the kids sizes, the adult sizes hold much more rice )
Rice (1 1/4 cup of rice for the smallest kid size 4-6 1/2, 2 cups for the next size up, 6-8 1/2.
White twine
Matching buttons
Fleece (for this you can either just buy scraps of fleece or use fleece scarves from the Dollar Store)
Patterned socks from the dollar store to use as hats
pins for the eyes and noses (blues, oranges, pinks)

Cut your socks like this.


Use the toe part of the sock to form the hat by rolling it over 2 times.


Nest inside out the rest of your sock and tie a knot with twine at the end.


Right side it out and stuff it with rice.


After you have filled it with rice use the twine again to tie off the top. Then use another piece of twine to separate the body of the snowman from its head.


Finish by adding the hat, buttons, pin eyes, and a fleece scarf.

This would totally make a cute gift to give for a family night! Here's one of the kits I created.


Hope you have fun! I sure did!


Homemade Caramel and Apples

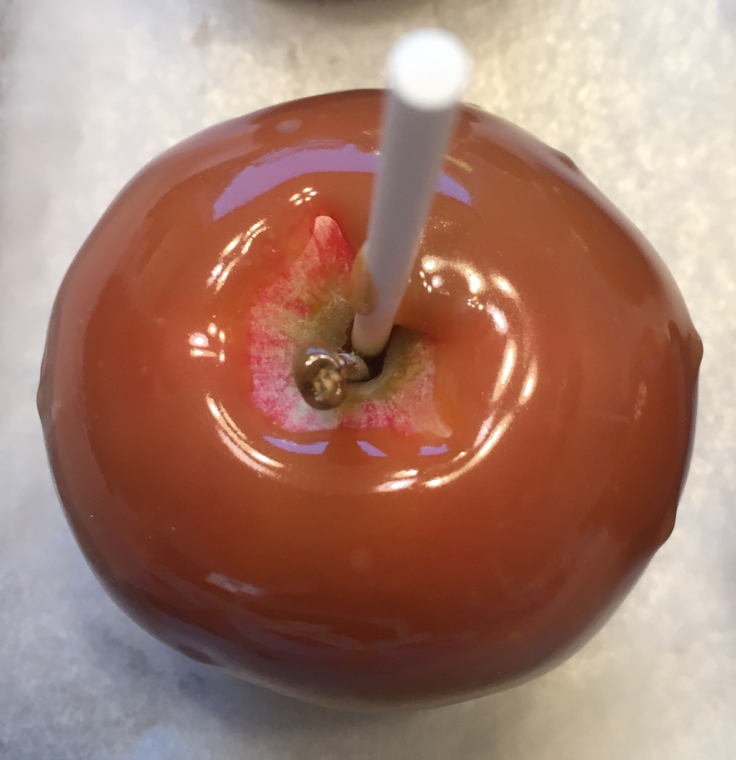
There is nothing more frustrating or rewarding than some delicious homemade Caramel dipped apples. This is a recipe that one of my favorite cooks was kind enough to share with me! I love it! The white chocolate with the spices sprinkled over it is WONDERFUL! I forgot to take a pic :-(


Caramel Apples

1 pound brown sugar (2 1/4 cups)
1 cup butter (2 sticks)
1 can sweetened condensed milk
1 cup light corn syrup
1 1/2 tsp. vanilla
1/4 tsp. salt
20 small apples washed (can soak in a large bowl of water with ¼- ½ cup vinegar) and dried well
20 dowels or craft sticks pushed into the tops of the washed apples

Topping:
White chocolate for melting (I used almond bark) melted in double broiler or microwave.
3 T. sugar
1/2 tsp. cinnamon
1/4 tsp. apple pie spice


Combine First 6 ingredients in a 2-3 quart sauce pan.  Heat at medium low temp. stirring constantly but slowly and frequently scraping the bottom of the pan.  Cook caramel to the soft ball stage (236) degrees.  Pour into a small deep metal or heat proof bowl and let cool to 200 degrees.  Line a baking sheet with parchment paper.  (I just sprayed the baking sheet with Pam) While caramel cools you can prepare the topping.  


Dip apples into caramel using a straight up and down motion (I find it's necessary to tilt the bowl and twirl the apple in the caramel to get it covered fully and this seems to work fine too).  Place dipped apples on baking sheet and place in the fridge for 15 to 20 min.  Next drizzle desired amount of white chocolate on top of apples and then sprinkle with cinnamon sugar mixture.   I also like to individually wrap them in a cellophane bag and tie it up with ribbon/twine etc.) 

Yum!

I have also experimented with making one of my favorite types of candies: Scotch Kisses. These are incredible, although I've got to figure out how to perfect the process and the packaging. This was my first attempt.


I used a homemade marshmallow recipe and then poured the caramel over the cut marshmallows. I'm still trying to find the best marshmallow recipe, but it's worth the effort for sure! Delicious!

Wednesday, October 14, 2015

Mermaids, Pirates, and Baptisms

My little Olivia turned 8 recently and got baptized. One of my good friends did her baptism pictures. She is an amazing photographer! If you want to check her out here is a link to her website!

Here are a few of my very favorites! (I should add that Olivia is extremely difficult to photograph! Megan did an amazing job!) She also did color, but I'm a sucker for black and whites!


This one is absolutely beautiful in color! I want to order a canvas of this one!


And now for the Mermaid Party! Although my iPhone pics look TERRIBLE after this lot!


We had tons of fun! It was mostly family, but we did invite a few of the neighborhood kids. We had a Treasure Hunt, and made these cute mermaid necklaces and starfish hair clips.


The clam cupcakes  were made using vanilla wafers, a bit of turquoise icing and some sugar pearls. They were so super easy!


My older son also helped me fashion a few wooden swords for the boys and I picked up a few eye patches at Walmart. Mostly the kids just had fun hanging out and jumping on the tramp.


Happy Birthday my beautiful Olivia! Mommy loves you!


Tuesday, August 18, 2015

Best Sour Cream Pancakes


I love Sour Cream Pancakes! The kids and I have had fun coming up with a recipe that works for us. Can you get sick of eating pancakes? I don't know, but we've sure enjoyed trying :-). I think we've had pancakes every day this week trying to get this recipe just right! Everyone has had a turn. We all had a good laugh the day one of us mistook a teaspoon for a Tablespoon of baking soda. It was the saddest day ever! Each of us had a heaping pile of what looked like delicious Sour Cream Pancakes topped with Buttermilk Syrup only to find that they were completely inedible. We had a long debate over whether you could eat them or not if you were actually starving, but in the end, even smothered in a scrumptious syrup they all found their way to the trash can.

Service for a family of 4:

1 1/2 Cups of sour cream
3/4 Cup of all purpose flour
3 Tablespoons of sugar
1 1/8 teaspoon of baking soda
3/4 teaspoon of salt
3 large eggs
3/4 teaspoon of vanilla extract
Butter for the skillet

1. Heat up your skillet. I set mine to 350 degrees.
2. Mix up all of your ingredients until just blended.
3. Butter the skillet. This is especially important for sour cream pancakes, even if you are using a non stick skillet
4. Use a large ice cream scoop to spoon even amounts of batter onto your skillet. Heat until thick and bubbly. I usually end up flipping mine a couple of times cooking them on each side twice, but DON'T press them down with your flipper!
5. Enjoy, I know you will!


Friday, August 14, 2015

Tomato Pin Cushion Pattern and Free Printable


I had a lot of fun creating this pincushion pattern. I plan on tweaking it just a bit, but for now, here it is. I hope you will enjoying using it!

Click here for the template. 

The printable actually has enough for two tomatoes. I always like to have a copy that is uncut for my records.  
Materials:

Red, green, or white embroidery floss
Matching button
1 6X3 piece of green fleece or quality felt
1 11X12 or 22X6 piece of tomato fabric
1 11X12 or 22X6 piece of single faced iron on interfacing

1. Start by tracing 6 tomato segments onto the nonstick side of your interfacing. Iron it to the wrong side of your tomato fabric following manufacturer's instructions. Doing it this way, rather than pinning and cutting 6 segments on both your fabric and your interfacing, saves a ton of time on cutting. 


2. After you have ironed your interfacing to the wrong side of your tomato fabric cut out each of the segments. 


3. Sew two segments together as shown.


Open it up and it should look something like this.


4. Now pin and sew a third segment to one of the two pieces you have just sewn together.


Open it up and it should look something like this.


5. Repeat steps 3 & 4 so that you now have two halves comprised of 3 segments each. 

6. Pin one half of your tomato to the other along one set of seams and sew from top to bottom. 


When you right side it out it should look something like this.


7. Pin your final seams together but instead of sewing from top to bottom leave a 2 1/2 opening in the center of the seam. In this picture shown you would start from one pin and go to the closest point, stop, cut threads, and then start again at the other pin and move towards the closest point leaving the middle open. 


8. Right side out and finger press the opening along the seam line. 


9. Stuff to your desired fullness. 


10. Do a blind stitch to close up the opening. 


11. Taking your embroidery floss go in and out down the center of your tomato from top to bottom a couple of times squishing it into a tomato shape. 


12. Now you are going to cover your seams with embroidery floss by stretching your floss around the curve of the tomato and down into the center of your tomato. Come up through the other side and curve around the opposite side of the seam you have just covered. Repeat until you have covered all of your seams with embroidery floss. Add a Knot, but don't sever your thread yet. 


You will undoubtably end up with one end of your tomato that looks better than the other. Choose that end for your bottom and the other end for your top. 

13. Cut your leaves out using either some fleece scraps or some quality felt. Attach your leaves and button with the rest of your thread. If you've run out, just grab a bit more. 


Voila!


14. Pin it if you Enjoy!