My new project for this summer is going to be keeping bees. I'm so excited. I thought I would document the process just in case anyone else is interested. So in all it took me about $300 to get started. That included the cost of the bees, the queen, the hive, and all of the equipment: smoker, gloves, hive tool, hat with veil, bee brush, and my license. I plan on just wearing white clothes which I already have. White clothes help to keep the bees calm and less aggressive.
Initially I thought I would buy my hive first and then order my bees, but I quickly realized that if I wanted to have bees and pick them up locally I needed to order them quickly before they were all sold out. Generally speaking you can start to order your bees in February to early March for an April pick-up, but check with your local suppliers. If you can't find them locally it is easy to order them online. All you need to do is notify your post office that you will be receiving some live bees. You can then schedule to pick them up when they arrive. I ordered Italian Honey Bees because they are known for being good honey producers and also because they are known for being very calm.
Next step was to get my hive and get it ready. I bought mine preassembled, but needed to paint it, so I decided why not make it pretty? I painted each super and the top and bottom with three coats of varying shades. So the top layer of green has 3 different shades of lime green, etc. I fully expect there to be some weathering and I thought it would be fun to see all the colors poking through. The reason for painting your hive is to protect it from rotting. The bees could care less :) Although most are just painted white. Light colors will keep your bees cool in the summer. I have read that if you live in cold climates it can help to paint the hive darker colors. You also want to position your hive facing South East in dappled sunlight. Too much direct sun light and your bees will have to spend all their time trying cool the hive and not have as much time for honey production.
I'll be picking my bees up on April 18 and I can't wait. I am somewhat nervous about actually getting them in the hive, but I have been doing lots of research and I think it will be an adventure! Here is a video that I found to be particularly helpful.
From what I have read when you first get your bees they are very docile and in want of a new home. They are happy to have a new hive to get settled into. Honey bees have only one sting and it is much more mild than a wasp sting or a bumble bee sting. Most Beekeepers will tell you that they can avoid being stung all together so long as they are not too aggressive or clumsy while working in the hive. If you do happen to get stung remain calm, scrape out the stinger, and puff some smoke near the area
where you were stung. When a bee stings they leave behind a chemical that lets other bees know that you are a threat to the hive. Once stung it is not uncommon to recieve more stings on the same site, but using a puff of smoke around the site minimizes the chance of getting stung again. The reason why you want to scrape off the
stinger is to reduce the amount of venom that is injected. Most people
pinch the stinger and then pull it out. But, by pinching the stinger you
pinch the venom pouch, releasing the full dose of venom. But, if you
scrape the stinger out with a credit card or your hive tool you lessen
the venom dose, thus the reaction to the sting is minimized as well.
For this first year I will not be collecting any honey. The bees will need it to get through the winter. collecting too much honey and not leaving enough for the bees to winter over will starve them out. If there are not enough bees to keep the hive warm they will freeze. So I won't be collecting honey until the summer of 2015.
Helpful Links:
Ordering Your Bees
What You Need To Get Started
Tuesday, March 11, 2014
Monday, March 10, 2014
Camp Kick Off!
This Sunday is our Camp Kick Off! I'm so excited to be officially presenting both our stake and ward themes to the girls. I think it's going to be a fun night! The YCLS have been hard at work creating a skit for the night and working on all of their various parts.
Our stake theme is Be BRAVE, it's a jungle out there! Each ward selected an animal to represent themselves. We are the Giraffes. It's been fun to come up with all kinds of ways of including this theme into our presentation. For our Camp Kick Off Night the YCLS have decided to go a little tribal :). Here are some images I found online for inspiration.
The YCLS skit is mainly to entertain the girls, get them excited about camp, and motivate any 1st time girls who are nervous about coming or girls who have had a bad experience as to why they should be looking forward to this year's camp. After all its going to be the best year ever!
Each of the YCLS will take turns presenting their skit, our themes, leading the music, etc. We will have on display some of the crafts we will be making this year at camp, Secret Sister Surveys, Permission slips, a packing list, and a few munchies. I think its going to be a great night! I plan on using the S'more cupcakes, something to drink, and maybe some dipped fruit.
Our Ward theme to go along with It's a Jungle Out There is Girl on Fire. We had lots of fun creating the invites for camp kick off. Here's a picture. It's basically an arrow with some tags stating the themes for camp and the date and time for camp kick off.
Materials:
Glitter Paper
Hot glue and glue gun
Wooden dowel
White twine (slightly thicker than thread)
Boa or package of feathers
Glittered paper to form arrow heads
Tags with information
Dark wood stain
1. Stain all of your dowels and allow them time to dry.
2. Create a triangle template to form your arrowhead out of cardstock. Cut two arrowheads per dowel. Use a hot glue gun to attach the arrowheads to the dowel taking care not to burn yourself. My 6 year old has been playing with the left overs, so they are pretty beat up, but you get the idea :)
3. Pull about 9 feathers from your boa. (I did not use glue to fasten my feathers to my arrows, I felt like I could wind them tightly enough in using the twine that they would not come out, but if you are worried you can add a small amount of glue. I personally wanted to keep the hot glue as far away as possible from the feathers!)
4. Start by holding about half of the feathers close to the dowel at the opposite end of the arrow. Wind your twine extremely tightly around the bottoms of the feathers leaving a "tail". After you have gone a few times around add the remaining feathers. Wind around the feathers over and over again until you see nothing but twine. At this point you can tie it off using the loose end and your tail.
5. Using the same twine, punch holes in your tags ( Mine were both double sided. They included both the stake and ward themes and the date and time for camp kick off) and tie them around one at a time.
Enjoy!
I also created a Secret Sister Survey which is basically just a questionnaire each girl can fill out that night. That way when we exchange names the girls will be armed with a little extra information while trying to decide what they want to do for their secret sister.
Wish me luck!
For more camp fun Click Here
Monday, January 20, 2014
A Vintage Lace Dress
My sister in-law recently asked me to create a dress for her reception. She wanted a vintage style lace wiggle dress. The first step was finding a good pattern that had all the elements that she wanted. She wanted it to have 3/4 sleeves, fall just below the knee, have a somewhat slim fit, and have a slightly rounded neck. We tried two. When working with vintage patterns it's always a good idea to go up a size or two. They tend to run a little small. We ended up going with a vintage simplicity pattern number 4676, but passed on the side seam and falling ruffles.
To find out whether or not we had a good general fit I created a muslin. I didn't do any of the finishing work or even stitch the back together where the zipper will go. The first fitting was just meant to get a general idea of how the pattern worked with her body.
Here's how it went.
As you can see it is a very rough cut. We decided to tweak the dress just a bit. We are changing the front gathers to pleats, running the front neck line just a little lower, and changing the back to a V shaped neck line. You can see all the messy pinning :)
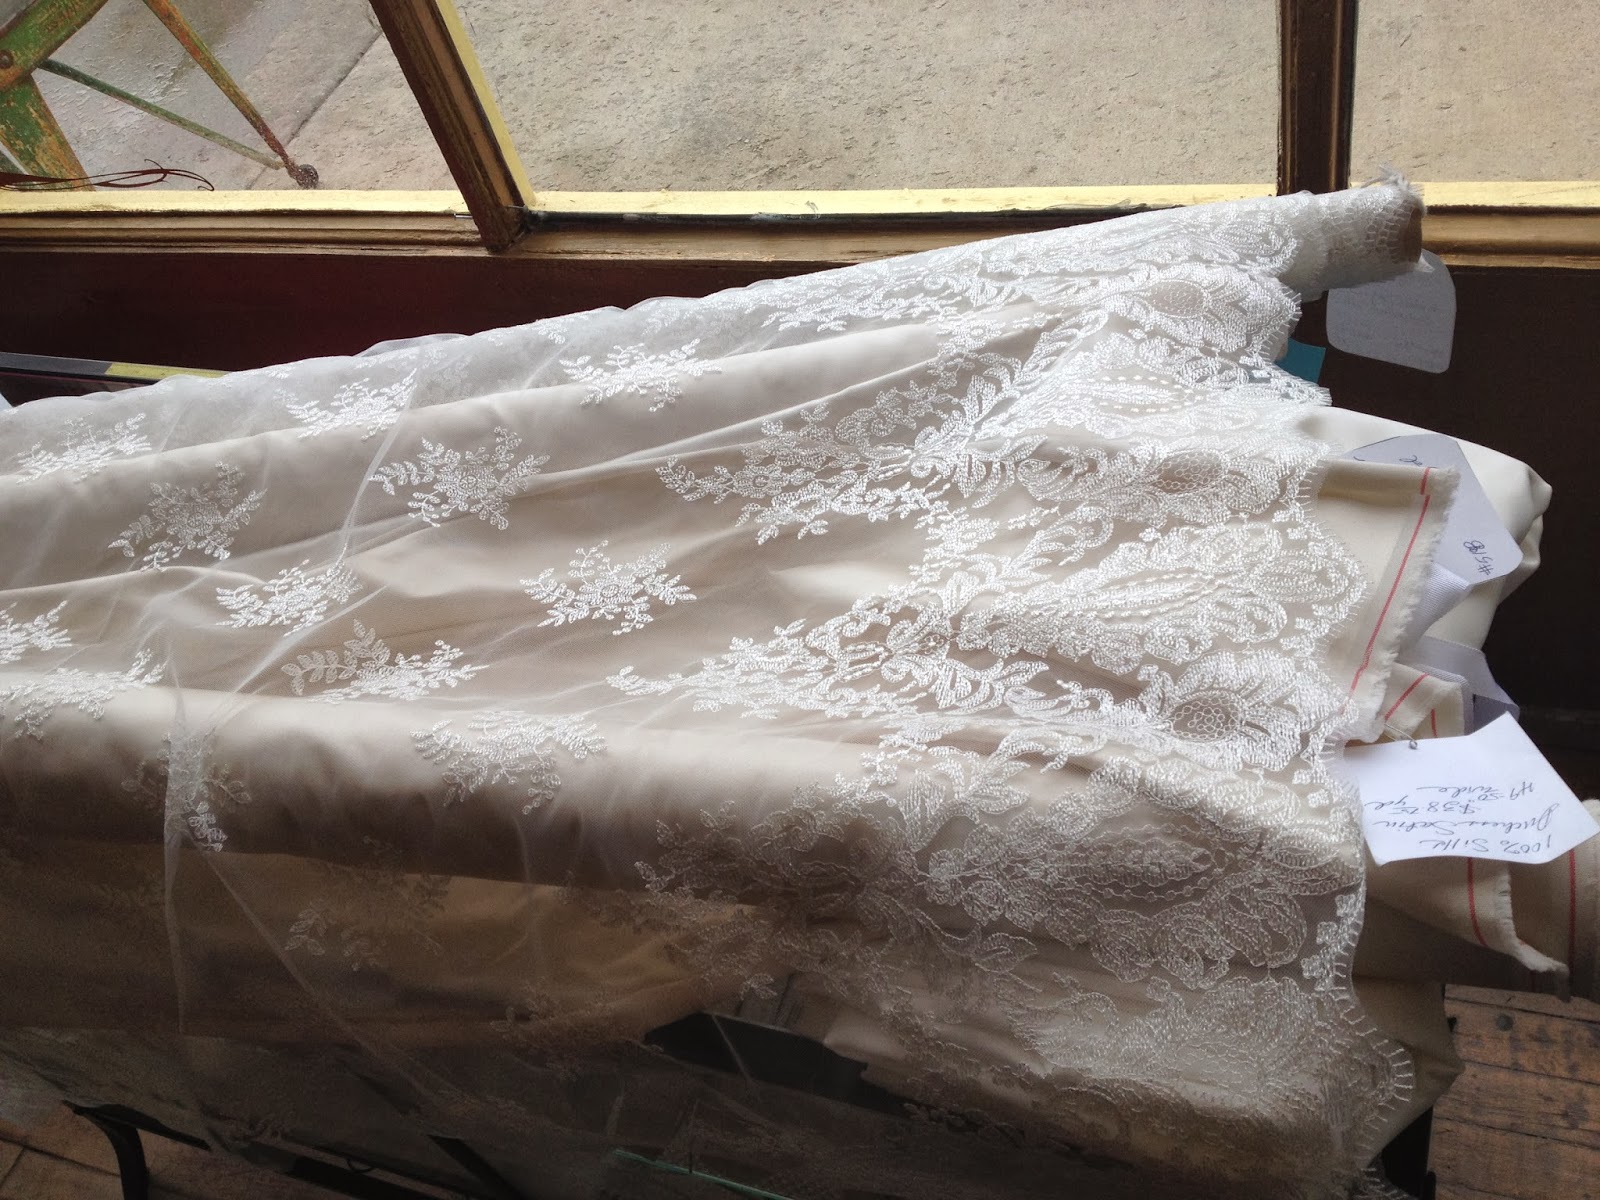
The next step was to find some quality fabric which proved to be a little harder than I though it should be :). We ended up finding a delightful little place called TissĂș Fine Fabrics and Design Gallery. It is operated by a wonderful lady named Theresa who was extremely helpful! Thank you Theresa! Here is what we ended up going with. I think it is beautiful!
The color isn't great in the picture, but man it is beautiful in person! The lace is an off white, and we ended up going with an off white satin that has just a bit more color to it. I think it makes the whole thing look richer and gives it that vintagy feel. We were also able to find some lining to put on the inside of the dress. Theresa was very helpful in answering questions on care for the fabric and even showed me a few tricks! I can't wait to see the finished product.
The Next step is to make a new muslin with all the finishing work and the changes we agreed on. Wish me luck!
Click the link below to see the finished dress. It was a beautiful wedding day!
Lavender and Lace
Click Here for more Needle and Thread
Sunday, January 19, 2014
S'more Cupcakes Please!
I have my son Harrison to thank for these wonderful cupcakes! He came home from a scouting planning meeting asking to bring cupcakes on his camp out. Don't ask me why, the story is long and only makes sense to 12 year old boys, but they wanted to start a cupcake on fire (flaming cupcakes?) This was my best effort :) The frosting is delicious! It tastes just like a roasted Marshmallow. I happen to think the graham cracker crust is optional. I tried both with and without for fun. Of the people that tried them we were about half and half for people who liked them better with the crust and those that liked them without. Here's Harrison, doesn't he look like a reasonable young man?
So here it is, without further ado,
Flaming Cupcakes: Makes 36
Crust: Optional
1 1/2 cups graham cracker crumbs
1/4 cup sugar
5 T unsalted butter, melted
2 Cups dark chocolate chips
1 bag of mini marshmallows (approximately 180 mini marshmallows)
1. Preheat the oven to 350 degrees.
2. Line 36 muffin cups with paper liners.
3. Using a whisk attatchment, mix graham cracker crumbs, sugar, and melted butter until well combined.
4. Add a leveled Tablespoon of crumbs to the bottom of each liner. Use a small circular object to press the crumb mixture evenly into the bottom of each liner. I used the bottom of my Solo plastic cup to press in the crumb mixture.
5. Bake for 5 minutes and remove from the oven.
6. Add a small handful of chocolate chips and 4-5 marshmallows to each cupcake bottom.
Chocolate Cake Mixture:
2 cups sugar
1 3/4 cups all purpose flour
3/4 cup cocoa powder
1 1/2 tsp baking powder
1 1/2 tsp baking soda
1 tsp salt
2 large eggs
1 cup whole milk
1/2 cup canola oil
2 tsp vanilla extract
1 cup boiling water
7. Combine all of your dry ingredients together in a large mixing bowl.
8. In a small bowl, add eggs, milk, oil and vanilla and whisk together.
9. Beat on medium speed for 2 minutes.
10. Add boiling water and beat on low until just combined.
11. Spoon batter into cupcake liners, filling each about 3/4 of the way full. (I like to use my medium cookie scoop to keep the cupcakes evenly proportioned.) The marshmallows will all pop up to the top but that's okay :-).
12. Bake approximately 18 minutes until a toothpick inserted in the center of the cupcake comes out clean.
13. Cool for about 5 minutes in the pan and then remove to a wire rack to cool completely.
Best Ever Marshmallow Frosting:
12 egg whites, room temperature
3 cups sugar
3/4 tsp cream of tartar
3 tsp vanilla extract
2 lg Hershey bars
14. Heat oven to the broiling setting.
15. If you have a stainless steel mixing bowl, create a double boiler by filling a pot with water and placing your mixing bowl inside the pot, or just use your double boiler.
16. Combine egg whites, sugar, and cream of tartar in your "double boiler". Whisk frequently, heating the mixture over medium-high heat until the temperature reaches 160 degrees.
17. Transfer egg mixture to stand mixer fitted with the whisk attachment. Begin mixing at low speed, gradually increasing to medium-high speed as the mixture becomes thicker. Beat until stiff, glossy peaks form.
18. Add in the vanilla and mix until just combined.
19. Transfer frosting to a piping bag fitted with a extra-large star tip and frost in rounds or as desired.
20.* Now for the fun part! Create a cold water bath for your cupcakes using a large glass casserole dish or whatever you might have on hand. (This will keep the cupcakes from cooking any further, but will allow the frosting on top to brown easily and nicely.)
21. Place your entire cupcake tin with the frosted cupcakes inside it into the cold water bath making sure that the water isn't even close to getting near the cupcakes, but that the bottoms of the cupcake tin are submersed in the water.
22. Put the cupcakes in their cold water bath inside the heated oven for a little less than 2 minutes. You will have to watch your cupcakes very closely! Broil to desired darkness.
23. quickly garnish each of your cupcakes with a square of Hershey's chocolate.
YUM!
If you would like to create some hassle-free individual serving to-go simply buy the short clear solo cups and some cellophane baggies. I found both at Walmart. Start by putting your cupcake into the solo cup. Next drop the cup with the cupcake in it into the cellophane baggie. Tie it off with some twine or ribbon. You can even add a cute little tag if you wish.
Hope you enjoy!
*If you prefer to use a kitchen torch scorch your cupcakes holding the torch about 6 inches away from the cupcakes moving the torch continuously so as not to catch any one spot on fire. Slow and steady does the trick! Make sure you are using your torch near NON-FLAMMABLE surfaces :)
Click here to see Toasted Marshmallow Milkshakes
For more recipes Click Here
Saturday, December 21, 2013
Hot Chocolate like at Nordstroms!
So recently I took my 6 year old Christmas Shopping. At one point we ended up at Nordstroms and this wonderful man brought us a tray filled with hot chocolate samples to try. It doesn't get better than chocolate and shopping! The memory alone is enough to keep me smiling! Anyway so my 6 year old finished hers then mine and demanded more. Having spent already more than I care to admit to even myself I promised her I would make some just like theirs once we got home. Here it is:
Hot Chocolate like at Nordstroms
1/4 cup of Hershey's Cocoa
1/2 cup of sugar
1/3 cup of hot water
the smallest pinch of cayenne pepper
4 cups of milk
3/4 teaspoon of vanilla
Whipping cream and
Cinnamon for garnish
Heat cocoa, sugar, water, and cayenne on medium low heat stirring constantly until it comes to a boil. Add 4 cups of milk. Stirring constantly, heat chocolate milk until just before boiling. Do not let it boil! You can tell that the mixture is just about to boil if when you stir it you can see a generous amount of steam rising from the pot. Not letting it come to a boil avoids the mixture developing a skin. If you look closely you can also see a little tension in the milk but no bubbles. Remove from heat and add vanilla. Serve with a dollop of whipping cream and a sprinkle of cinnamon or some crushed candy cane.
Enjoy!
For more recipes Click Here
This Home Made Egg Nog is Better than Crack!
Home Made Egg Nog
Ingredients:
3 1/2 cups milk
1 teaspoon ground cinnamon
1 cinnamon stick
generous pinch of ground clove
6 egg yolks
3/4 cup granulated sugar
1 cup heavy cream
1 1/2 teaspoons pure vanilla extract
1/4 teaspoon nutmeg
whipping cream for garnish
Directions:
Combine milk, cinnamon, cinnamon stick and clove in a medium saucepan over medium low heat. Heat the mixture until just before boiling. You can tell that the mixture is just about to boil if when you stir it you can see a generous amount of steam rising from the pot. Not letting it come to a boil avoids the mixture developing a skin. If you look closely you can also see a little tension in the milk but no bubbles. ( In the South we'd say "It's fitt'n to POP!") Let the cinnamon stick steep for 2 minutes & then remove.
In the bowl of a standing mixer combine egg yolks and sugar. Whisk together until pale and fluffy. With the mixer on low, pour the hot milk mixture into the egg yolks 1/4 a cup at a time, tempering the yolks. Whisk until well incorporated. Pour the mixture back into the saucepan and heat on medium low for about 5 minutes, continually stirring, until thickened and creamy. Do not let it boil, or the egg nog will curdle.
Stir in the vanilla, heavy cream and nutmeg and refrigerate over night. (Don't skip this step! The egg nog is great, but it is phenomenal after it has had a chance to sit over night!) When ready to serve garnish with a spritz of whipping cream and a sprinkle of cinnamon.
YUM! Enjoy!
For more recipes Click Here
Wednesday, December 11, 2013
How to Season a Chalkboard
Seasoning your Chalkboard is very important to do before you use your new chalkboard or one you have just made. Otherwise, the first words or pictures you draw on your board will get "burned" into the board.
1. The first step to seasoning your chalkboard is to take a piece of chalk and and run it vertically along the entire board covering the whole surface.
2. Next run it horizontally along the entire chalkboard.
3. Afterwards you can erase the chalkboard with an eraser or a paper towel. If you prefer a newer looking board use a wet cloth.
4. Enjoy! Your new Chalkboard is ready to use!
For how to make your own framed chalkboard click here.
For more crafting fun Click Here
How to Make a Framed Chalk Board
This is a super fun and easy project that will make you want to repeat it over and over again! I just got called to be our ward camp director and I plan on using my framed chalk board to help decorate for one of our pre-camp activities.
Supplies:
Cute Frame (TJ Max is an excellent source for inexpensive and unique frames)*
Valspar's Black Chalkboard Paint
Paint tray or large dish
Small roller Brush
Garbage bag and some tape or some other protective surface
Chalk
Have a sheet of masonite cut to fit into the frame you have chosen at your local hardware store
1. Make sure the masonite board you have had cut fits into your frame perfectly. Make any adjustments necessary. I had my board cut to fit standard sized frames, but after I got home I was surprised to find that so many of the frames I had on hand weren't quite standard! I ended up using my quilting ruler, an X-acto knife, and my cutting board. You wouldn't want to do all of your boards this way (lot's of elbow grease), but it works just fine for small adjustments.
2. Protect your work surface with some plastic sheeting or a plastic bag. As you can tell I have reused mine several times:)
3. Make sure the sheet of masonite is clean by wiping it with a damp cloth removing dust and debris. Let it dry.
4. Poor a small amount of chalk board paint into a paint tray or large dish.
5. Lay your masonite on the plastic sheeting and roll on the first coat of chalk board paint. Do this much like you would paint a wall. Start by painting an M or a W then spread the paint with first horizontal lines and then follow through with vertical lines until the whole board is covered.
6. You will need to do 3 coats, but you have to allow for enough time for the coats to dry thoroughly. Valspar Chalkboard paint requires a full 24 hours between coats, so fold up your sheeting, wash out your brush and be patient!
When I purchased my masonite board at Lows it came in a very large sheet for around $8-$9. The first 2 cuts are free and then each subsequent cut is .25$. I had them cut 2 of each size of frame. So for example 3X5, 4X6, 5X7, 8X10 etc. I always have extra frames lying around, so why not extra chalkboards!
7. After you have painted your 3 coats and allowed them to thoroughly dry slip the glass out of your frame and place the new chalkboard, but don't forget to season your chalkboard before using it! (see my tutorial for how to)
*On occasion you may find that the glass in your frame is actually glued down. I used my X-acto blade to slip in between the layers of glass and frame to separate the two, but I'm not sure I would recommend doing this. It would be much easier to find a frame that is not glued to the glass.
Hope you have fun, I certainly did!
I also had fun creating a chalkboard table for my kids to play with while outside. What fun!
For more crafting fun Click Here
Tuesday, December 10, 2013
How to Make a Great Apple Pie
This recipe is a combination of a couple of different recipes and tips I have picked up from watching other seasoned homemakers.
What you will need:
For the Crust:
2 1/2 Cups unbleached all-purpose flour (King Arther happens to be my favorite & yes it matters!)
1 TBSP sugar
1/4 tsp kosher salt
2 sticks (1/2 pound) of chilled butter, cut into 16 pieces
6 tablespoons ice water
For the Filling:
7 Golden Delicious Apples
1/4 tsp ground allspice
1/2 cup sugar
1 tsp ground cinnamon
butter for dotting
flour for dusting
How to do it:
For the Filling:
1. Core and slice your apples. Place in a bowl and mix with sugar and spices. Set aside.
Pre-heat the oven to 425 degrees.
1. The first thing you will want to do is prepare the work surface you will be rolling your pie crust on. You will need a clean, large, flat, work surface such as your kitchen table.
2. Mix flour, sugar, and salt together in a large bowl with a wire whisk or else in a mixer such as a KitchenAid.
3. Add cut pieces of butter to the flower mixture and stir with a wooden spoon until all of the pieces of butter are coated with flour.
4. Now get ready to make a mess! Dump the bowl of butter and flour mixture onto your work surface. Working as quickly as possible roll the flour and butter creating large wide flakes of butter. It is helpful to have a dough scraper handy. Roll a few times then scrape your flour and butter into a pile and roll again. Some of the butter will stick to your rolling pin and the table, just use the dough scraper to pile it all up again. Once all of the butter has been rolled into wide flakes of butter use your scraper to scoop it back into the bowl.
5. Add 6 tablespoons of ice water to the dough and mix just until combined. There will be some large clumps of formed dough and debris that have not clumped. The dough will not be smooth! Press together with your hands forming a rough ball. Your object in working quickly is to keep the butter cold and flaky so that it remains suspended as identifiable pieces within the dough. This is what makes the crust so tender and flaky with a puffed quality.
6. Dust a large, clean, flat surface such as your kitchen table with a generous portion of flour. Next sprinkle it with sugar and roll your rolling pin over the surface to help spread it around and coat the rolling pin with flour as well.
7. Separate the ball of dough into two equal halves.
8. Now it's time to roll your pie crust! Here is a video that shows how. My mother-in-law took the time to show me and it was very helpful. You can tell by the picture that the table has been generously dusted. That is key to not having your dough stick to the table or the rolling pin which can result in tearing. You'll notice that when the dough is small I shift it around picking up extra flour to keep it from sticking. As the crust gets rolled bigger I adjust by changing the position of the rolling pin instead. Roll from top to bottom, then from side to side, and then in diagonals, and repeat the process until you have a piece of circular dough large enough to more than cover your pie plate and account for any unevenness.
9. Center the rolled dough over the pie plate by using your rolling pin to help lift the dough. (Shown in video). Cut the excess dough away leaving about a 1/2 an inch to 1 inch of dough to fall over the sides of the pie plate. This can be done fairly crudely without to much worry.
10. Dump your spiced apples into the pie plate, dust with a bit of flour, and dot with butter!
11. Roll the top crust as in step 8 and use it to cover the top of the pie. Trim to the same length as the under-crust. Next fold top layer of crust under the bottom layer of crust creating a pocket.
12. Shape the crust by using your fingers to create ruffles. My pie plate is shaped with ruffles but this works just as well with a regular pie plate.
13. Create vents in a decorative pattern using a fork to prick the dough.
14. If you like you can add a little interest by adding a "centerpiece". I used small leaf cookie cutters from William Sonoma and added some coarse sugar for fun.
15. Next fashion a pie shield using tin foil so that the edge of the pie does not get overly done.
You can opt to save your "pie Shield" for future use or just make it from scratch each time
16. In goes the pie! Bake at 425 degrees for 10 minutes then rotate the pie a half turn and reduce the temperature to 375 degrees. Bake for 30 more minutes. Remove the pie-shield and bake for a final 10-15 minutes until the pie crust is a delicious golden brown!
17. Enjoy! You deserve it!
Subscribe to:
Posts (Atom)