Monday, July 25, 2016

Pioneer Day in Primary


This Sunday we reviewed our Primary Program songs Pioneer Day style. I had so much fun! We circled the wagons by doing away with the chairs, and forming a circle around a fake fire. We sang songs, told pioneer stories, and played a few pioneer games like Button Button, and Handkerchief Drop, but the highlight for me was making butter! I had never done this before :-). It was super simple. I put about a cup of cream in a mason jar added 1/4 teaspoon of salt and let the kids pass it around the circle and shake it all up as we sang our songs. At the very end we let all the kids try the butter they had made on a piece of homemade bread! So Yummy!


After you get to the point where the cream is mostly solid then you can strain the excess liquid (buttermilk) off and press it into a ball or some other form. We didn't do that for primary, but as soon as I got home I took the extras and made us a little butter ball :-).

Have you ever seen a chicken lay an egg?

Have you ever seen a chicken lay an egg? Well here you go...
Just click here

Saturday, July 23, 2016

Penelope lays an egg!

It's definitely and interesting first egg! I'm anxious to see if her future eggs will have as much texture and speckling? I'm guessing yes on the speckling, but no on the weird texture. I've been wondering why people say first eggs are weird. My other first eggs have been beautiful. I totally get it now. This one's definitely on the weird side, but is it? Or will this be Penelope's normal?


I've been trying to stay near the chickens the last couple of days so that I can keep track of who is laying and which type of eggs they are laying so that when they all get into the swing of things I can tell if there is a problem and who's problem it is. It hasn't been too hard because I have a ton of work to do still on the shed portion of the coop. I sat and watched Penelope ( She is one of my other Ameraucanas. She is a white/wheaten.) for about an hour try and lay her egg. I got it on video, but I'm having a hard time uploading it, so I'll post it later. Here is a photo for now :-) I had no idea it was such hard work!


OK, here's the video, just click here

Good job Penelope!

So here is a pic of Penelope's second egg next to her first, there was quite a difference.


Tuesday, July 19, 2016

Kids Cooking Classes

We've been having fun at our house with kids' cooking classes. The Boys made Storm Trooper Cupcakes and Vader Tots. The girls made Minnie Mouse cupcakes and a baked pasta Alfredo. The kids have been entertaining and fun to work with, very endearing!


The homemade tater tots or "Vader Tots" are out of this world good. The kids loved them. I wish I had more! The recipe is simple:

6 potatoes
4 cloves of garlic, minced
1/4 teaspoon of onion powder ( although I would like to try them with just finely chopped onions instead)
1/4 teaspoon of dill
1 Tablespoon of flour
Oil for frying and butter to coat your hands
Optional: fresh parsley

1. Boil the potatoes for 7 minutes.
2. Let them cool
3. Meanwhile mince your garlic.
4. Grate your potatoes using a cheese grater.
5. In a big enough bowl to hold all of you potatoes add the garlic, onion powder, dill and flour.
6. Mix well
7. Use a mellon baller to keep the size consistent. Butter your hands. The potatoes mixture will be SUPER STICKY. Shape potatoes into tater tot shapes.
8. Heat Oil on medium high and toss the tater tots until they are golden brown on all sides.

Hope you ENJOY!


We made a cream cheese frosting. I'm not fond of the traditional equal parts butter/cream cheese frosting so I make mine a little different. I use a three to one ratio. This recipe will frost about 48 cupcakes

1 1/2 cups of butter (3 sticks) at room temperature
8 ounces of cream cheese
8 cups of confectioners sugar
3 teaspoons of vanilla extract

Whip it good, Whip it real good :-) Until it is smooth and there are no lumps.

I'm still trying to find the perfect white cake recipe so for now I'm not going to list that.


I loved the way the star cupcakes turned out. To get that beautiful midnight blue color I mixed and shook a 3.25 OZ container of black sprinkles with a dark blue sugar sparkle container about half that size. I found both at Michael's. I couldn't find the shade of blue food coloring that I wanted so I mixed a lot of blue with just a dab of black food coloring.


The hardest part about the Minnie cupcakes was the red fondant bow, but even that wasn't too hard. I bought the red fondant from Walmart. If you go to the cake decorating isle it's $10 for a large box, but we didn't need a whole lot. You can also find it on the baking isle with the candles and such for $3-$4 dollars. That amount was perfect. I cut it into strips and we made the bows out of the strips. 


I also love this baked pasta Alfredo dish, Delish! 

Ingredients:

Pasta of your choice. 
1 Tablespoon of olive oil
4 cloves of garlic, minced
3 Tablespoons of flour
1 cup of chicken broth
1 1/2 cups of cream
3/4 cup freshly grated parmesan cheese
1/2 teaspoon of salt
1/4 teaspoon of freshly ground black pepper
2 Cups of shredded chicken ( I usually just pick up a rotisserie and use that)
1 1/2 Cups of Mozzarella 

1. Boil your pasta according to the directions on the box.
2. Meanwhile, you can start your sauce. 
3. heat 1 Tablespoon of olive oil on just over medium heat
4. Saute garlic until just golden
5. Add in you flour and brown for an addition minute or two taking care not to burn the flour or garlic
6. Add in the chicken broth, cream, parmesan, salt and pepper.
7. Heat just until it starts to boil.
8. Now it's time to assemble your pasta.
9. In a large enough bowl to hold all of your pasta mix pasta and sauce together.
10. Add chicken and stir once more.
11. Place your pasta and chicken in a casserole dish and top with the mozzarella.
12. Bake until the cheese is melted and golden brown, about 15-20 minutes.

This may just become your new favorite dish, it is that good!


Thursday, July 14, 2016

Thanks Giving!

So this is totally an old post that I never published. I found it as I was going through my blog posts as a draft. But I had so much fun making the cabbage candles and pear place cards. This blog is kind of like a journal for me, so even though this is years old... here it is.

This year I feel like we have even more to be thankful for than usual. It was a wonderful Thanksgiving! I completely forgot to take pictures of anything, but lucky for us Gina remembered her camera!

YUMMY!


Sunday, July 10, 2016

A Journey Back in Time

Just after we got back from Trek

This week for Singing time I decided to focus on our pioneer heritage in honor of Pioneer Day. There was a gentleman by the name of Brigham Henry Roberts (10 Yrs old) who traveled with his sister Mary (16 yrs old) without his parents from England to the U.S. and then joined the saints in Nebraska and traveled to and settled in Bountiful, Utah. His stories can be found in a book called I walked to Utah. I paired each of his stories with a song for the kids to sing. It will take about two weeks to finish this activity which is perfect! Here is a link to his History. Read through it, it is quite entertaining. I used pick sticks to call a child up and answer a question about our pioneer history before I shared one of his stories and we sang the corresponding song.

Question 1: What were some of the trials the pioneers had to face? (I'm looking for being COLD)
Story 1: Using his sister's petticoat as a night covering
Song 1: Pg. 74 I Feel my Savior's Love "His Spirit warms my soul"

Question 2: Did the Pioneer Children have rules they had to follow? (Stay with the group)
Story 2: River crossing and having to be fetched out of the river by the captain
Song 2: Pg. 236 Give Said The Little Stream

River Crossing

Question 3: How did the pioneers get their things to Utah? (Wagons, 17 lbs of personal items per person, we compared it to our primary president's baby, but you could easily bring in a back pack etc.
Story 3: Sleeps in a barrel of molasses on the wagon instead of walking all night
Song 3: Pg. 219 Here Comes the Ox Cart

Question 4: Did everyone make it to Utah? (6,000 of about 60,000-70,000 died along the way)
Story 4: His baby brother's grave sight/ Captain uses his bread box
Song 4: Junior Primary Pg. 60 Jesus Wants Me For A Sunbeam, Senior Primary Pg. 44 Mary's Lullaby

The Second Rescue Memorial

Question 5: Besides the elements, lack of food, and fatigue can you think of one more trial the saints faced along the way? (Indians)
Story 5: Meets an Indian/Stampede
Song 5: Pg. 118 Book of Mormon Stories

Question 6: About how long do you think it took for the saints to cross the plains? (3 Mo)
Story 6: Coming to zion/meeting his mother
Song 6: I am a child of God
I especially liked his comment, "There was one thing remembered in this reunion, and that was on my part. I felt that I had arrived, that I belonged to somebody, that somebody had an interest in me, and these were the thoughts that were in my mind as I sat in the wagon on the drive home to Bountiful.

I hope you will search out his stories, I found them both moving and entertaining!

Monday, July 4, 2016

First Egg!

Yesterday we found our first egg! You wouldn't believe the excitement in our house :-)


Our birds are mostly free range. We tuck them in every night for bed, but from sun up until sun down they roam the yard searching for bugs and forage. They have continuous access to feed and water, but seem to prefer to scavenge. I built their nesting boxes a few weeks ago, but we haven't finished the portion of the coop that they will go into yet. So for now they are resting on a dresser we have on our patio. I found a great tutorial here and made two sets. (Now that my chickens have started to lay eggs I'm noticing that these boxes seem just a little small? They are plenty deep, but the girls seem like they could use an inch or two more in the width. Errrrg! I don't want to make new ones, but I'm sure it is going to bother me until I do!)


I was nervous that they wouldn't use the nesting boxes because they weren't in the coop, they spend most of their time hiding out in our bushes along our property line, but I placed the fake eggs in the nesting boxes hoping they would do their job.


They did! We found Phoebe's egg right next to the fake ones :-) She is our Marans and is the only one that will lay chocolate colored eggs.


Here's a picture next to a penny for size and color reference. Her first egg was fairly small, but I expect they will get larger as she goes.


Can you tell I'm a proud chick mamma? If they're going to remain free range and they continue to lay eggs in the nesting boxes I'm wondering if I should just leave them where they are? It's kinda nice to not have to go through the coop to collect the eggs. Also they stay pretty clean where they are. They don't spend time in them other than to lay eggs, so I don't have to worry so much about dirt and waste getting on the eggs. Watching them first find the fake eggs was hysterical! They were out there for a few weeks with no notice before they found them. When they did, I went running outside to see what was going on because it was so noisy! Each of the birds took turns hopping up into the box and checking them out. Rooster was the funniest. He stood on the perch making the loudest noises while all of the hens stood on the ground cackling underneath him. It was as if he was shouting "Who's your daddy!" :-).


He even takes a turn showing the ladies how it's done!


Most of our hens are normal sized hens. Our rooster (affectionately named Rooster) is a bantam and then we have two bantam hens. I bought my bantams as a Straight run mixed batch and haven't been able to identify the grey one's breed. Does anyone have a clue?


What am I?


I'm guessing a blue or lavender ...... something? What color eggs will she lay? If you know, let me know :-) (I finally figured out what breed penny is! She is a true bantam breed which means she doesn't have a larger counterpart. She is a Self Blue (or Lavender) Belgian d'Uccle Bantam. This is so cool! I grew up in Belgium so I am even more in love with Penny now. She will lay tiny white eggs. I'm learning so much! Self blue means that the plumage color is evenly distributed over the entire birds body. There are no secondary colors such as in lacing. Now I'm wondering what will happen when I cross my white leghorn rooster with penny? Any takers?

As part of our mixed flock, I also keep a couple Ameraucanas. Sage is a beautiful Blue/Wheaten.


Yesterday she laid the most beautiful turquoise egg! I'm so in love with the color. First eggs are so much fun.


Here it is next to the Marans' chocolate egg. It was just a little bit bigger. First eggs are supposed to be quite a lot smaller than the later eggs so it will be fun to see the difference.


I had no idea that getting an egg out was so hard. I was out in the back yard working on the floor of our shed/coop section of my coop. right now they are just using the run portion of the coop during the night.


Anyhow, Sage was acting very strangely. She kept hopping up on my lap wanting to be held. which was strange because I was using loud tools like the sander and the drill. But the noise didn't stop her. She was also going in and out of the nesting boxes as if simply being in them would make the egg come out. In between hopping up on my lap and in and out of the nesting boxes she was wondering the yard like a crazed chicken. For the most part the chickens stick to the shade. They follow it all day long. Especially in this triple digit weather we've been having, but she was wondering out in the sun looking dazed. Right before she laid her egg I held her for about an hour. She then hopped up in the nesting boxes and I heard her egg drop. She also chose to lay her egg right next to the fake egg :-) Good job Sage!

I was happy to be there because I am trying really hard to identify which eggs are coming from which chickens. I have several varieties, but I have 2 of each. Some of the varieties lay similarly colored eggs, but even within the same breed there can be a difference in color, so I am trying hard to keep up with who is laying what ;-) Who'd a thought having chickens could be so much fun!

First eggs are so much fun!


Monday, June 27, 2016

Build an Ark

I'm having so much fun being the music leader for primary despite my obvious lack of talent in singing :-). I have fun with the kids and truly believe primary is where it is at! This last week we started learning Build an Ark found at LDS.org It's such a beautiful song and this was such a fun way to learn it. I started out by writing the words to the song in segments in rainbow colors on strips of paper. I also drew a few pics to help the kids who weren't quite reading. We talked about Noah's story and Heavenly Father's rainbow promise. We listened to the music and learned the words segment by segment. After we'd gone all the way through the song once (This is the fun part!) I used pick sticks to have a child come up and mix my "magic potion" to see what would happen. It was fun to see what the kids thought would happen. A few guessed explosives :-). When they mixed the spoons into the water a color would magically appear after a few seconds and we would take all of the segments written in that color off the board and try to sing the song without those words. It was super easy and super fun!


My printer happens to not be working otherwise I totally would have just printed things off. 
I totally just copied images I saw online.


To make the "magic potion" simply place two drops of food coloring on a spoon and then put a pile of baking soda on top of the drops of food coloring completely hiding the color. Have 6 clear cups of water ready and 6 spoons tipped with different colors and baking soda. When the child comes up to mix in the spoon a color will "magically" appear and those words disappear!


Hope you enjoy!

Monday, April 25, 2016

Chickens, Chickens, Chickens

This year we decided to take on chickens. It has been one of the funnest and most rewarding experiences. I really do love my little chickens, even if they're not so little any more!


I bought my chickens 3 different ways. I picked up a couple of unsexed bantams at our local Tractor supply store, picked some up from a local breeder, and split a batch that my sister ordered and had delivered via the US Postal Service. I'm sure every post office is different, but that was definitely my least favorite way. We got all kinds of conflicting information from the post office from "we don't do chickens", to "we don't hold them, we just deliver them per usual with the rest of the mail", to "they're here please come pick them up." For us, it was a matter of talking to the right person, which seemed odd. We can't have been the first ones to order chickens! Also, I think the journey was a little hard on the sweet little chicks. Thankfully all of them made it alive and stayed alive.

Of the three ways, I would definitely recommend meeting up with a local breeder. Although, I will say my experience with the Tractor Supply sales staff was excellent! As with beekeepers it's always easy to find chicken owners who are willing to share helpful hints and tricks. I lucked out at the Tractor Supply Store and found a lady who happened to keep a flock of her own. She gave me all kinds of helpful information and even helped me collect all of my supplies and answered any questions I had with enthusiasm and personal experience. Most of the chicks were either unsexed or in a container with other breeds so as a novice it was hard to pick out the variety I was looking for with any certainty. It was also hit or miss. They weren't exactly sure which breeds they were getting and when they were getting them. They got new shipments in every week, so it was more like a stop by and see thing. I've since done a lot of research about which traits are considered good and bad within the breeds that I have purchased. If I could go back, I would have done that research first and been a bit more knowledgable when picking my chicks out, instead of going with the cute factor. Overall I'm pretty happy with what I have. I enjoyed the relaxed atmosphere of going to a local breeder. The one I went to had her chicks clearly labeled, sexed, and separated. I also had a choice of age, anywhere from newborn to 6 weeks old, with the older ones being more pricey. I wanted to raise mine from chicks and have the opportunity to bond with them so I went with the newborns. Another advantage of going with a local breeder was that the chicks seemed a bit healthier and less stressed than the mail ordered chicks. Baby chicks will get something called "Pasty Butt". Pasting up is a condition caused when the chick's droppings stick to the down around it's vent. The dropping can cause a build up forming a blockage which can be fatal to the chick. It's usually caused by stress to the chick in shipping, being to hot, too cold, or improper diet. They have to be watched carefully the first few days or they can literally die from this condition. If you notice a blockage starting to form you need to gently clean the blocked up area. Never pull on it to get it off. Soften it with warm water and gently rub it off with a washcloth or tooth brush. Some people will just let warm water run over their chicks behind while washing it off. I preferred letting them soak in a bowl full of warm water just high enough to cover their vent. I also kept my chick separated with food and water near the heat lamp until it was dry and watched it closely. Chicks will peck at anything that looks different in any way!

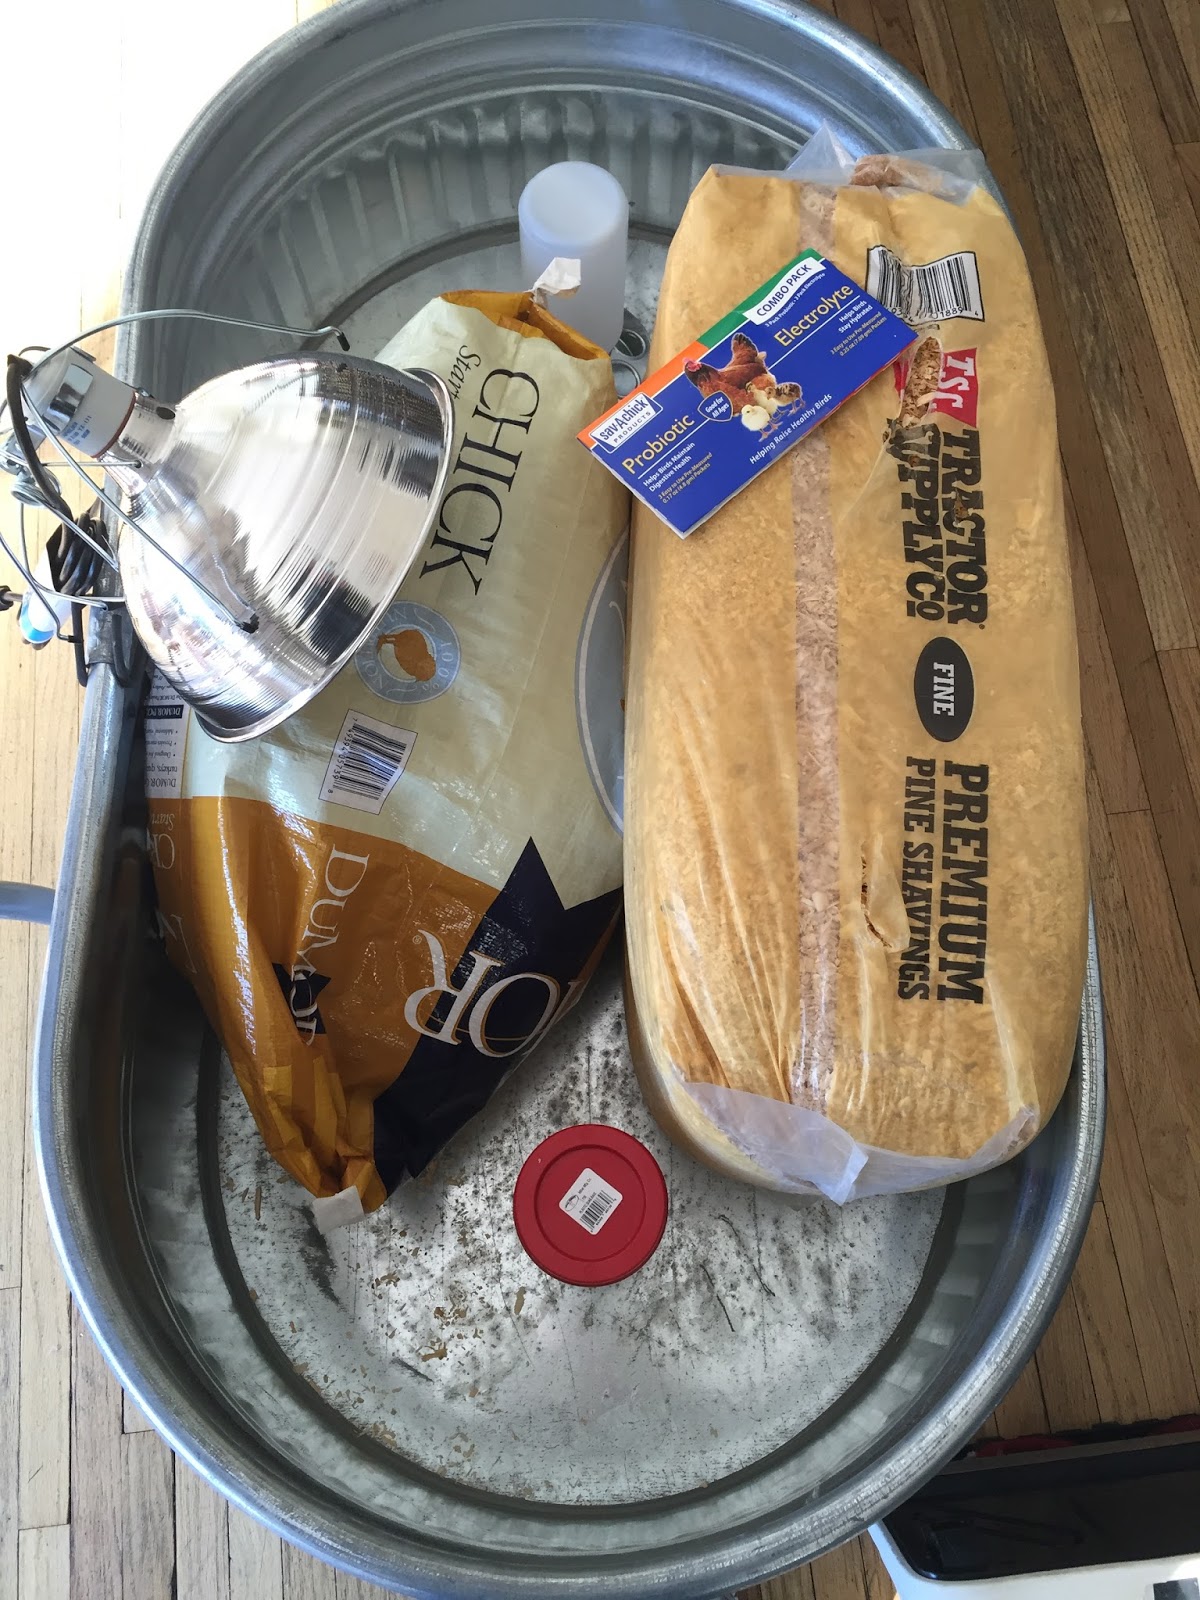
Baby Chicks require a few supplies:

Brooder
Litter
Waterer
Feeder
Chick Starter
Heat Lamp


Extras include probiotics and electrolytes for a good start or you can simply add a little sugar to their waterer. 

Brooders can be made out of just about anything. I have a neighbor lady who kept a few chicks in a cardboard box lined with paper towels. The advantage being that you can simply throw it out when you are done with it. I knew that I wanted to invest and have this be a long term project so I bought a big metal trough from the tractor supply store. Your chicks will grow amazingly fast in a very short time and be hopping over your brooder walls so make sure you have your next step figured out before you get your chicks. They don't last long in the brooder!

A good brooder should have several features. It should:

have adequate space
protect from outdoor predators or indoor pets
have good ventilation
have a reliable heat source
freedom from drafts
protection from moisture

We happen to have a lovely cat


Letting your cat watch you open the chicks lets him know that they are yours. I followed all the rules, made my introductions, but I still wasn't going to trust the cat even though he has a very friendly temperament. I was lucky to have an imaginative son who helped me create a top for my brooder.

Here Harrison is constructing our lid. I told him what I wanted it to do and he came up with the materials and design.


The cat was definitely interested.


A chick has very little way of protecting itself from the cold. It was still very cold when we got our chicks with snow still on the ground so I gave them several weeks in our house in my little girl's room.  She is a chick master with just about no fear at all :-)


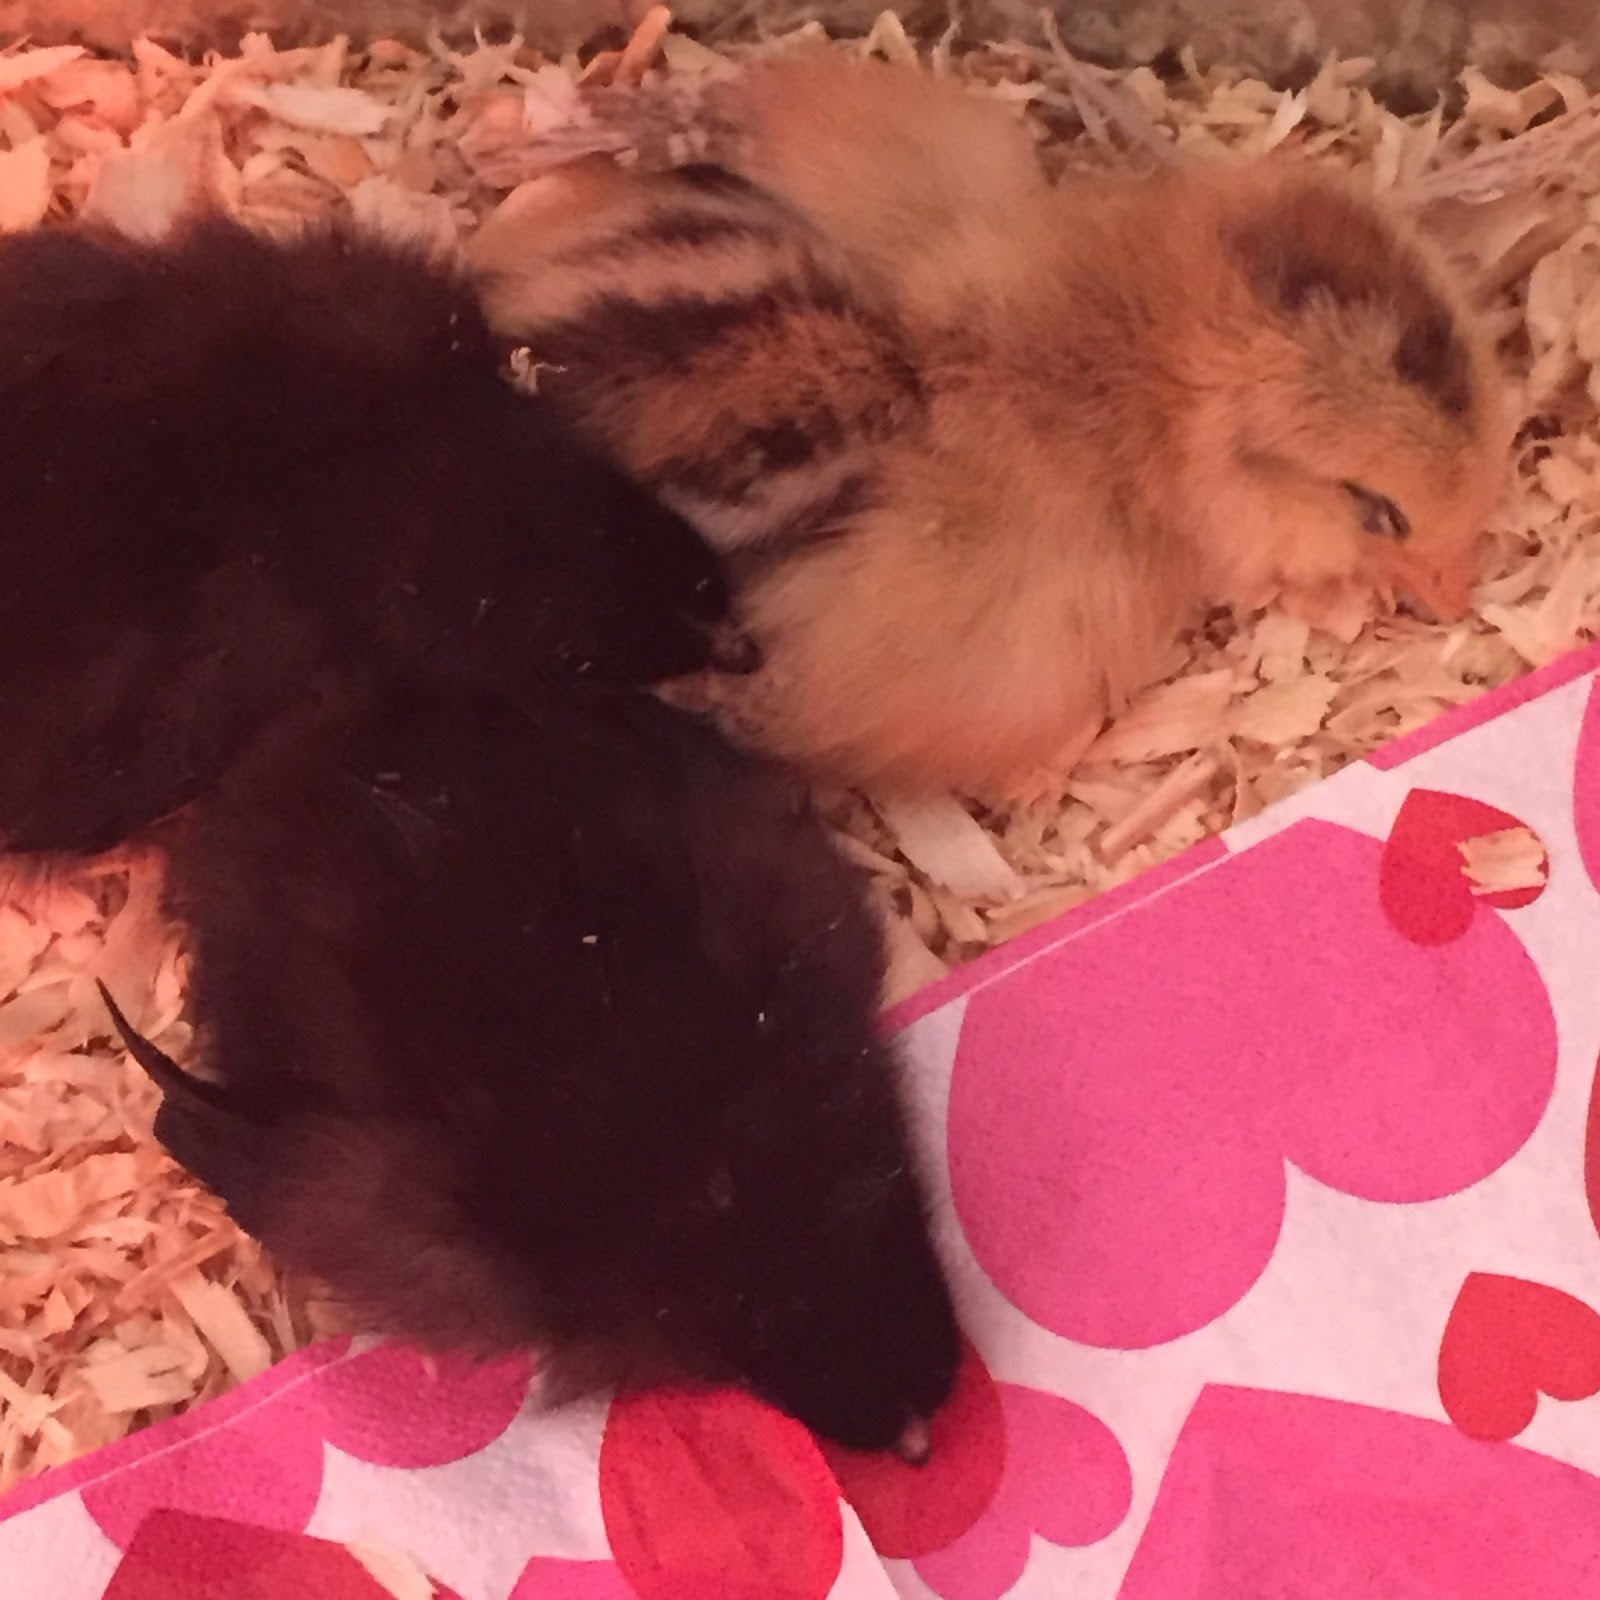
There are also lots of options for the litter. My very favorite is pine shavings for several reasons. When your chicks are little the fine shavings work best. When they get a little bigger you can go with the regular sized shavings. Pine shavings work best for me because they are fairly absorbent. Paper towels, newspaper etc tend to be extremely messy and require frequent cleaning. Pine shavings also have a wonderful smell. It won't take those chicks long to funk it up, but it's nice while it lasts. You should completely clean out your brooder at least once a week, although for me it was more like every 5 days. After that I couldn't take the smell. Cleaning it out includes dumping all of the litter and waste, washing it out with some dish soap, and starting out with at least 2 inches of fresh litter.  As far as the in-between time, I added a fresh layer of pine flakes every morning and sometimes at night. If your waterer has leaked at all you will need to get rid of any wet bedding.

Waterers can be the most annoying thing about having chicks. You will most likely end up buying at least two sizes. The big ones are too big for baby chicks. A chick could easily drown in one. In fact they are constantly falling asleep with their faces planted in their feeders. It is quite funny! But, the small ones won't last long at all. The chicks will outgrow their little waterers rather quickly. Both the little waterers and the big waterers will need to be refreshed daily and cleaned out with dish soap at least once a week. The little ones tend to get clogged up rather quickly with bedding so it is extremely important to check on them frequently. The little waterers sometimes need to be refreshed several times a day. I would recommend checking on them hourly for the first couple of days until you get a feel for their patterns of behavior and needs.  Here is an image of the waterer and feeder that I used in the beginning. Once your chicks move to a bigger waterer you can solve a lot of the clutter in the water by placing it on a stand of some sort. I used a large paver stone that was about 3 inches high, and then moved up to a stump several inches taller once my chicks got a bit bigger. The important thing is to make sure your chicks can get to their water. Your water will still need to be refreshed daily, but at least you can count on them having clean water for a whole day! Another problem I had with the little waterer which seems to not be unique to me is that if I didn't get it on just so it would leak. This caused two problems: one it saturated the bedding nearest to it and two, the chicks went thirsty. I could tell they were because when I realized what had happened I brought them fresh water and they all came running to guzzle down some water.


Feeders come in all kinds of varieties. The small one in this pic with the holes worked great for me. As with the waterers you will most likely need to buy two sizes, one for when they are just chicks, and one for when they get a little bigger. Both the waterers and the feeders will be labeled with how many chicks they can reasonably accommodate. Having two of each is also recommended so that chicks low on the pecking order have a place to get a drink or eat. As with the waterer your feeder should be thoroughly cleaned out about once a week.

It's also important to buy the correct feed. Laying hens can be given chick starter in a pinch, but chicks should never be given layer ration. There is an overload of calcium in layer ration that could cause serious problems for your chickens later. Every bag of feed will be labeled with what it's for and the appropriate age category.

Heat lamps are a must, but be careful! The brooder temperature should be 95 degrees F for the first week of life. Heat lamps with a red bulb are best. They discourage the chicks from pecking each other. Chicks will peck at anything that looks even slightly out of the ordinary, but especially red. The idea with the red bulb is that it makes everything look red. The temperature can be dropped 5 degrees F each week until the brooder reaches ambient temperature. The chicks must be able get away from the heat lamp if they are too hot. They can die if they get overheated. Also, it's not a good idea to keep the feed or water too close to the heat lamp. If the chicks are all huddled together shivering under the heat lamp your brooder is probably not warm enough. Conversely if they are all huddled at the furthest corner away from the heat lamp it is probably too hot. You should see them freely walking around, not too clustered, with some of them enjoying the heat of the lamp, some of them scratching around and some of them at the waterer and feeder station. The one exception I noticed to this was at night when they were all sleeping. They'd form little rows and dog piles of happy sleeping chicks, one of my favorite sights!


First Things First

The very first thing you do when you get your chicks is to dip their beaks in water. Whether they come in the mail or from the store the most important thing is that they know where their waterer is. They will die without it, and in the case of mail order chicks they've been about as long as they can without it already. Watch carefully and make sure that all of your chicks are drinking and eating. Here they are a bit bigger.


It's so fun to watch their feathers come in. Some of them will look quite straggly and you may be temped to think something is wrong, but they're fine. They just look a little weird for a while. After about 20 days they should get their feathers in and will be capable of maintaing their body heat.

Mine loved going on walks and scavenging for treats when the weather was nice enough. Be prepared for them to run straight to a tree line or row of bushes. They don't especially like being out in the open at first. Mine made a B-line straight for the bushes where I watched them eat spiders and worms and all kinds of tasty bugs.


One of Livy's favorite things to do was dig up some worms for them and watch them play keep away with them. It's called food running and it's super fun to watch.


They are so much bigger now. They love being outside, dust bathing, and scratching for bugs. They will eat just about anything! But avoid giving them uncooked potato skins or avocados. These can be poisonous to a chicken. The happiest I ever saw them was after I had given them the rinds of watermelon I had cut up for a snack for my kids. I love Twofors!


Here they finish off a bit of yogurt I was snacking on. It was a little messy, but they couldn't get enough!


They are still getting used to being outside so every time a truck passes by or a dog barks they go running. They have a favorite corner of the back yard behind the garage that they run and huddle to.  They sure do keep me entertained.


I enjoy letting them free range while I am outside with them. They always have access to feed and water, but letting them scratch for bugs and eat grass cuts down on the amount of feed they go through. It's also so much better for them and the eggs they will be laying!